Fabric-Dyed Easter Eggs

Wrapping an Easter egg in textured fabric before dyeing creates an intricate pattern that looks like hand-painting. To get the look, use fabrics such as lace, cheesecloth, or netting. Wrap a square of your chosen fabric tightly around the egg, twist to close, and secure with a rubber band. Dunk the egg in food-safe dye, using the fabric tail as a handle.
Decoupage Easter Eggs

Fashion cute and creative crawlers out of pastel origami paper and adhere them to dyed Easter eggs. A coating of decoupage medium keeps these kid-favorite creatures in place. For small details, like eyes, use a miniature hole punch.
NEXTTie-Dyed Easter Eggs

You'll never guess the secret ingredient in this easy egg-dyeing method...so we'll just tell you. It's food coloring! To give your eggs fun color and texture, moisten a paper towel slightly with vinegar, then wrap it around an egg, making sure the paper towel layers aren't too thick. Gently press the tips of food-coloring tubes onto the paper towel, using no more than three colors at a time. Let the covered egg sit for a few minutes, then remove the paper towel to reveal your groovy creation.
Floral Easter Eggs

Give Easter eggs a gorgeous garden-inspired finish with dimensional floral scrapbook stickers. After pressing the pretty blooms onto dyed eggs, display the dressed-up decorations in silver egg cups.

For this modern take on Easter egg decorating, you'll have to get a little messy. Once your dyed eggs have dried, dip a paintbrush in black paint. Hover the brush over the center of the egg and tap the handle to splatter the paint. Play around with the technique -- the harder you tap the brush, the bigger the splatter marks.
Band Egg Design

Decorating Easter eggs has never been easier. Create a bold look with graphic stripes on dyed eggs with rubber bands. Wrap eggs with wide rubber bands (the ones often found on broccoli at the supermarket) before dunking them in dye. Wash rubber bands well between uses to avoid transferring dye.
Sticker Egg Designs


Anyone can easily re-create this egg design with a bit of paint and a few brushes. Once your dyed eggs have dried completely, dip a thin-tip paintbrush in one color of paint and add a few dots. Let dry for a few minutes, then rinse and pat dry your brush to add a different color of paint. Play around with brush size and paint color to create a stylish egg design.
Try a New Twist on Easter Eggs
Try a New Twist on Easter Eggs
Robin's Egg: To create the base color shown above, add two drops of green food coloring to standard blue egg dye, and then dye egg. Once dry, dip a fine-tipped paintbrush in a small bowl of brown liquid ink (available at craft stores) and splatter on the egg.
Paper Napkin Egg: Unfold a paper napkin and cut into ½-inch-wide strips. Use Mod Podge and a small paintbrush to adhere strips to the egg, lining up the pattern and trimming away any excess napkin. Once covered, let dry, then apply a final coat of Mod Podge.
Twine Egg: Use a small paintbrush to apply crafter's glue onto the top of an egg. Starting in the center of the top, wrap twine (we used four-ply) into a tight circle. Continue to brush on glue and wrap the egg until it is completely covered. (You will use approximately 12 feet of twine.) Trim excess.

Silk-Dyed Eggs
Who knew that silk fabric transfers onto eggshells as easily as the dye in a decorating kit? Regular old vinegar plus hot water does the trick.
Step 1: For each egg, cut out a 5-inch square of patterned 100 percent silk. (We limited ourselves to black-and-white prints to achieve the effect above; colored patterns yield more vibrant results.) Lightly dampen the fabric, then lay it flat, right side up, and place your egg in the center. Gather the fabric tightly around the egg, like a beggar's purse, and secure with a rubber band. Repeat this step for the same egg, using a same-size square of plain white cotton and a second rubber band. Note: Use blown eggs if you'd like to keep your handiwork longer.
Step 2: Place eggs in a single layer in a nonreactive pot and add enough water to cover them by 2 inches. Add 4 tablespoons of white vinegar. Bring the water to a boil, then reduce heat and simmer for 40 minutes.
Step 3: Remove eggs with tongs and cool about 20 minutes. Then unwrap the fabrics to reveal the exquisite designs.
Botanical Eggs
The secret to these mini masterpieces? Foliage and flowers gathered from the garden. Blogger Sonia Bauer of Bigsislilsis.com simply positioned a blossom or a leaf facedown against each egg, then wrapped the egg in a four-inch square of panty hose and secured it with a twist tie.
To achieve these earthy hues, Bauer whipped up her own dyes using purple cabbage, yellow onions, and cranberries.
Step 1: Select produce based on your color choice: 1 (12-ounce) bag fresh cranberries; 1 head purple cabbage, sliced; skins from 3 yellow onions.
Step 2: In a covered, 8-quart stockpot over medium-high heat, bring 10 cups water and produce to a boil; let boil for 30 minutes. Reduce heat to low, then strain and discard produce.
Step 3: Bring water back to a gentle boil, then stir in 3 tablespoons vinegar (1/4 cup for cabbage). Gently lower eggs into pot and boil for 30 minutes.
Step 4: Turn off heat, cover, and let stand for 2 to 3 hours, or until desired color is achieved. Remove eggs and transfer to carton; let cool.
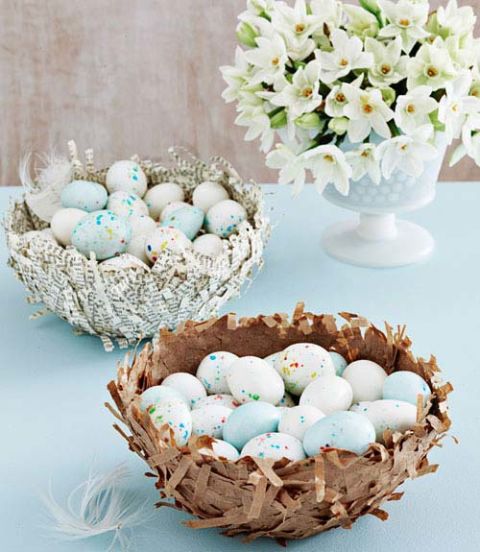
Take a page from the grade-school activity book with these delicate candy dishes, made using shredded brown lunch bags and sheets from an old dictionary. You can also use these nests to corral your decorated Easter eggs.
Step 1: Tightly cover a small bowl with plastic wrap, then flip the bowl upside down on wax paper. In another container, mix equal parts water and clear glue.
Step 2: Dip handfuls of shredded paper into the glue mixture, then immediately lay them on the bowl until it's covered.
Step 3: Lightly press dry paper strips along the outside to create a "nesty" look.
Step 4: Let dry for 12 hours; carefully pull the wrap off the bowl and away from the nest.
Sharpie Easter Egg Decorating Idea
I haven’t been feeling especially crafty lately, but this Sharpie Easter egg decorating idea popped into my head when I was thinking about making some them with the kids. Much easier than breaking out all of the messy dye!

I cut these little bunnies out of vinyl with my Silhouette CAMEO. If you don’t have one, maybe you could find some stickers to use. (The bunny design is from the Silhouette Online Store – assorted bunnies by Jamie Koay.)

Put the bunnies on some hard-boiled eggs.

Take a sharpie and make little dots around the sticker. Start close together and then make them further and further apart.

Peel the vinyl off and bam! You’ve got a bunny egg. You could even make some cute chickie ones or use the letters of your kids’ names. So many possibilities!

So fun and easy for the kids… if you trust them with a Sharpie.

Want to Check Out More Silhouette Projects?
Make these DIY Kawaii inspired ice cream cone eggs in a few easy steps:

1- Paint the entire egg with a light tan color.
2- Paint the top of the ice cream cone in a color of your choice, creating little rounded scallops where the paint reaches the cone part of the egg.
3- With a light pink marker, draw “cone” lines on the cone part of the egg.
4- Use a black sharpie to draw a Kawaii face, if desired.
5- Add final touches to the Kawaii face with small dabs of white paint (for the eyes) and pink paint (for the cute little cheeks).
APR 1 2015

You know how much we love indigo dye, right? Well I had to try our hand at marbling eggs this year – so I gave the nail polish technique a try. I used an indigo nail polish to match some of my favorite shibori indigo dye projects. Although the marbling technique can get messy, the end result is beautiful. I went with a monochromatic effect by using one polish color. I really love how it turned out. These DIY Marbled Indigo Eggs are a must this Easter!
Here are some of our favorite Easter projects – clay bunny bowls, bunny cupcakes, a cute bunny purse, and our favorite vintage iron-on bunny shirt.
Read more for the tips on marbling eggs…
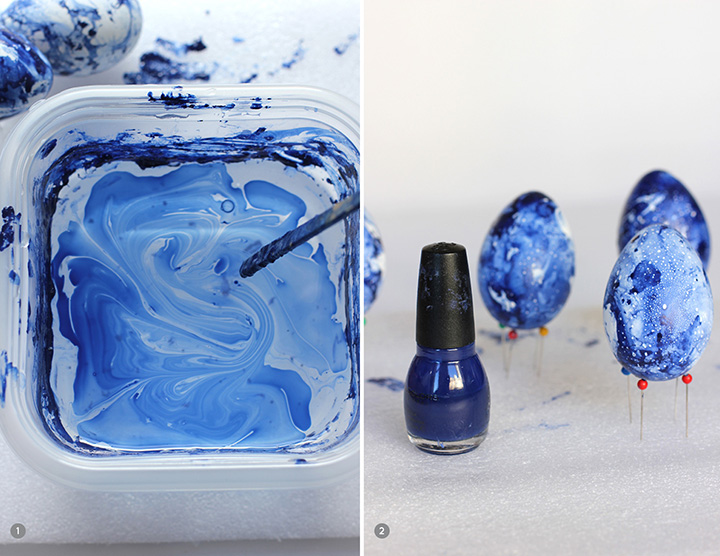
Supplies: faux eggs (or room temp hard boiled) // disposable plastic container // blue nail polish // rubber gloves // stir stick // drying holder // nail polish remover // room temp water
Step 1. Fill plastic container 3/4 full with room temperature water. If the water is too cold the polish will sink. Add a little bit of nail polish.
Step 2. Lightly stir with stick to make a marble look in water.
Step 3. Dip the egg under the water and swirl. Wear rubber gloves. I learned the hard way. I will spare you a picture of my fingers after dipping a dozen eggs in water/blue nail polish! You could also try using small tongs to remove eggs.
Step 4. Dry the eggs. I took a piece of foam and used pins to make a drying rack.
You could use any color combo of nail polish. I love how the indigo turned out. Look for more indigo and shibori projects from us this Spring!

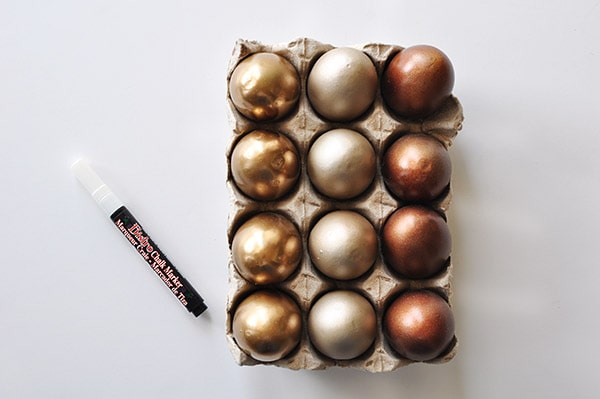
Supplies:
Eggs (Not edible are best since you are spray painting them)
*Spray Paint (Vintage Copper / Caramel Latte
 / Gold
 )
)
*Fine Point Bistro Chalk Marker
Eggs (Not edible are best since you are spray painting them)
*Spray Paint (Vintage Copper
*Fine Point Bistro Chalk Marker

Step one is heading out to a well ventilated area and spray painting the eggs. I painted four eggs in each color and they each took a few coats to cover.
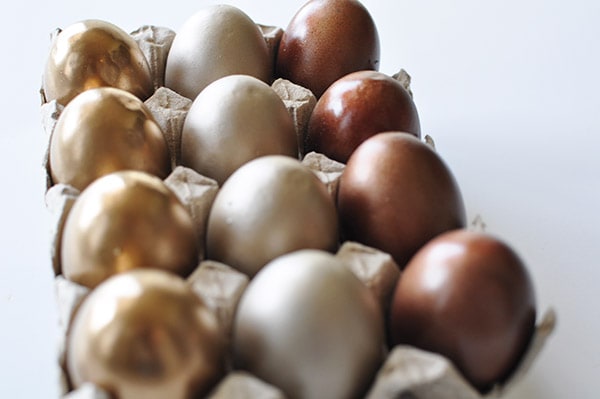
After the eggs were dry, it’s time to do some decorating!
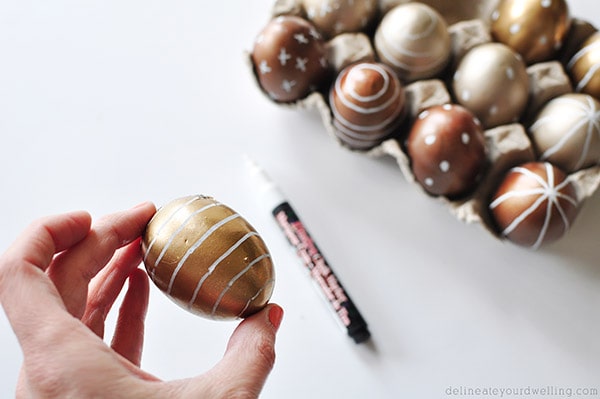
 The good thing about using this *Bistro Chalk marker is it provides a nice clean matte colored line, but if you make a major whoops, just use a damp cloth and it wipes right off.
I did four different designs; a cross pattern, horizontal stripes, polka dots and vertical stripes.
I kept trying to decide on a favorite pattern and I’m not sure if I can.
I’m leaning towards polka dots and horizontal stripes.

Temporary tattoo paper can be found on Amazon for $10 for 2 printable sheets, and you can easily decorate 30 eggs with each sheet. You can print anything you’d like and then transfer it onto a hard boiled egg! I created this free printable sheet with 30 hipster egg tattoos that you can download by CLICKING HERE.
The images are designed backwards because they get reversed when you transfer them onto the eggs.
You can use this printable to make eggs like these:

I dyed a few of my eggs first and mixed in a couple of brown eggs because they looked so pretty, but you can use this technique on plain old white eggs for a mess-free alternative to dyeing eggs. Want to see how easy this is? Here’s what you do:
The tattoo paper comes with 2 printable sheets (white) and two adhesive sheets (clear with a green backing). Print out the designs on one of the white sheets and let it dry (mine only took a few seconds to dry). As directed on the package, cover the designs with one of the adhesive sheets and use something hard and flat (I used a pancake turner spatula) to rub the adhesive down onto the designs. The package instructions include directions for cutting your tattoos out using a cutting machine – just ignore that info.
At this point your tattoos are ready to be cut apart and applied.

1 – Trim around your design, leaving a small border around it as shown.
2 – Peel off the clear plastic portion. As you peel, you should see adhesive on your printed design.
3 – Place the design where you want it on your egg.
4 – Cover the tattoo with a damp cloth, gently pressing down to form the tattoo paper to the curve of the egg. Wait 10-15 seconds.
5 – Carefully remove the paper, leaving your design on the egg.
It’s a really simple process – everyone’s probably applied a temporary tattoo before, but there are a few tips I learned:
First – DO NOT use super cold eggs straight from the fridge. The tattoos will not adhere. We hardboiled some eggs, let them cool to room temp in cold water, then dried them and applied tattoos and it worked great. I refrigerated a couple extra eggs and tried adding more tattoos the next day when they were straight out of the fridge: no go. If you’re using eggs from the fridge you can let them sit in warm water for a few minutes to bring them to room temperature before adding tattoos. (If you’re planning to eat the eggs, you might want to boil, cool to room temp, decorate, then refrigerate right away as opposed to chilling, warming back up, and chilling again.)
Next – temporary tattoos are made for flat surfaces and eggs aren’t flat, so you may end up with a few wrinkles in your designs once applied (look at the “good” on the first egg below). Use extra large eggs to minimize the chance of wrinkles.
If you look closely you’ll see that there is a slightly visible “film” around the design – that film is a little bit more visible on brown eggs than white eggs, and was actually less visible on the dyed eggs.
Remember, you can print ANYTHING and transfer it onto your eggs (just make sure you reverse the image before printing!).
My kids and I made some LEGO guy eggs last week:
Galaxy Easter Egg Tutorial


For this project you will need:
- Plastic, dyeable Easter eggs – chalkboard or white + black acrylic paint (eggs are $2/dozen at Walmart)
- Variety of colors acrylic paints
- Sponge brushes
- Stiff brush
- Cup to thin out white paint with water

So the first thing I did was started to paint my white eggs black. This was taking FOREVER and then I remembered that right by these lovely white eggs at Walmart were chalkboard ones, too. And since those just so happened to already be black, I decided it was worth it to head into town and snag some of those.

You can do this either way but if you’re impatient, starting with the black eggs is the way to go. The one on the left is 2 coats of acrylic that took about 15 minutes of time to paint TWO! The other is the already black egg!

You’ll need to grab some craft acrylic paints in tones of blue and purple PLUS black, white and gold. The colors don’t have to be anything specific so just use what you have already accumulated in your stash!

To make things interesting and keep all of the eggs from being too similar, I painted galaxies on some that were straight up black from the packaging. On others I swirled colors to give it a different look.

To make the swirled background, take any paintbrush with moderately soft bristles and smooth on your blue tones haphazardly. While these colors are still wet, dip your brush into the black paint and swirl the colors around. Don’t brush too much or you’ll just mix the colors up and have an almost solid egg rather than the pretty cloudy look.

Grab a cheapie sponge brush and start with your darkest color (mine is a teal that is difficult to see) and then daub your next darkest blue on top making sure you can still see sections of the darker, especially around the edges. Allow to dry.

Onto your dry egg, daub purple and then pink on top of the existing blob of colors. Allow to dry again.

Take a different sponge brush and just BARELY dip it in the black. Lightly touch to the surface of the egg to add black speckles. This might be a good thing to practice before hitting up all of your hard work on the eggs.
Next lightly dip another sponge brush into the gold. Lightly daub the color on sporadically or wherever you see fit.

Grab that white paint and put it into something small. I like these medicine measuring cups. Add a tiny amount of water to thin it out to the consistency similar to a milkshake that you can actually get through the straw.

Grab that stiff bristled brush and hold in your hand with your thumb on the bristles like so…

Let go of the bristles and the white paint with splatter. This is another technique that is good to practice and make sure you like the consistency of your paint as well as the distances required to make different patterns of speckles (think larger or smaller, further apart or densely speckled).

Be sure to speckle some white paint stars onto the rest of the egg that doesn’t have the galaxy painted on.

It’s pretty awesome how totally random your galaxy eggs will turn out.

Don’t worry about making them uniform, just get after it and you’ll see how awesome the variety can
BOTANICAL EASTER EGGS

Materials: acrylic paint, paper mache eggs, paint brushes, decorative moss, an egg carton, andThe Paper Garden: An Artist Begins Her Life’s Work at 72 by Molly Peacock for some lovely inspiration
Step 1: I chose to use paper mache eggs because I didn’t want to worry about cracking. Paint them black with acrylic paint.
Step 2: Draw flower shapes with a pencil and paint them in in solid blocks. I painted all the shapes first on all the eggs before moving onto detail. I used shapes inspired by Mary Delany’s work and made a Pinterest board that you can use as a reference.
Step 3: Once the solid shapes are in, start adding in the detail with additional color and small paint brush strokes.
Step 4: If you want to, use a varnish over them. I left my plain because I like the matte look.
If you make some, make sure to take a photo and tag it with #MakingWithLars.

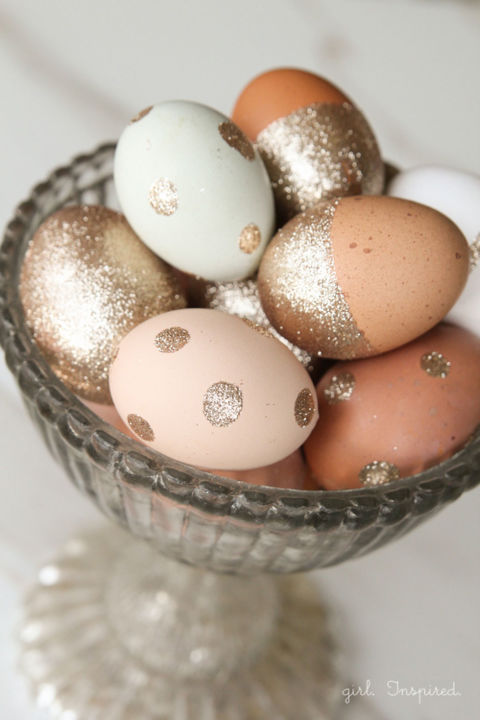
Gold Drip Easter Eggs

Gold Drip Easter Eggs

I recently got some Liquid Gold
http://www.amazon.com/gp/product/B007C7XKWE/ref=as_li_tl?ie=UTF8&camp=1789&creative=390957&creativeASIN=B007C7XKWE&linkCode=as2&tag=linesacrossmy-20&linkId=YR76QE4LHJGG3Y3D
for the first time. I’ve seen so many other projects where people have used it in the past, and I’ve been meaning to get some for such a long time, but I just kept forgetting about it whenever I headed to the craft store.
…and it’s better than I imagined. The paint is very heavy and shimmery. It has an unusual texture and density that makes it drip and gather in unpredictable ways.

DIY EMOJI EASTER EGGS
s to draw/paint each face. I shared the order in which I drew each one, but do what works best for you!


Ikat Easter Eggs
These Easter eggs are inspired by the patterns and vibrant colors in Ikat fabric. They are very easy to make, especially for last minute Easter party plans!

You will need:
- hard boiled eggs
- Sharpie markers
- pencil

First, use a pencil to draw guidelines on your egg.

Then you can draw the pattern. In this case, I chose diamonds. It can be chevron, or curvy shapes.

Next, choose your color scheme.

I like to start with the lightest color first.

Color the eggs with Sharpie in an up-and-down motion to create that Ikat effect.

Fill in the rest of the egg with another marker

And don't forget the final touches.

And you are done!

Go ahead and try making them and I hope you enjoy my tutorial!

SEWING 101: EMBROIDERED EGGS
by Brett
5 Years Ago

Some people may get spring fever, but around this time of year, I get egg fever. Egg decorating is, without a doubt, my all-time favorite holiday-crafting activity. When I came across an image recently of eggs made by Ukrainian folk artist Forostyuk Inna that were embroidered (yes, really embroidered!), my mind was officially blown. A way to combine egg decorating and sewing? Sign me up!
My research didn’t uncover much in the way of a how-to for this technique, so after much obsessing, I decided to give it a try on my own. To my surprise, sewing on eggs isn’t really difficult at all, once you get the hang of it! I know you don’t believe me, and this project truly does seem to defy the laws of physics. But just read on to learn the secret of sewing on eggs. — Brett Bara
CLICK HERE for the full how-to after the jump!

Materials
- raw eggs (I recommend using good-quality eggs, farm-raised if possible — they have much thicker shells than factory eggs.)
- Dremel or other rotary tool with a diamond cutting disc and mini drill bit
- embroidery floss
- long, thin needles
- small, sharp scissors
- craft glue
Instructions
In the steps that follow, I’ll show you how to make the egg above, but you can easily adapt these instructions to make just about any type of embroidery design you like.
1. Cut a hole in the egg.

The secret to sewing on eggshells is that you cut a small hole in the back of the egg. Now, I know what you’re thinking: you can’t cut an egg, it will shatter! Not true. Egg shells are actually quite cut-able with the right tools.
The trick is using a Dremel tool with a diamond cutting disc or other disc meant for delicate jobs. Hold the tool perpendicular to the egg as shown, and cut a round sliver from the edge of the egg. (The contents of the egg will splatter a bit, so do this over a sink.) I promise that with just a little practice, this will seem easy, and you’ll have nice, smooth cuts. Just give yourself a little time (and it doesn’t hurt to have some extra eggs on hand).
Note: The contents of the egg should not be eaten after cutting the egg with tools. If you want to save the egg contents, you can blow out the egg before this step, but this will result in extra holes in your shell.

Wash out the inside of the egg with a little dish soap and warm water and allow to dry. The image above shows how it will look when this step is done. (This hole is a bit large for demonstration purposes; you can cut smaller holes, which make for a nicer finished presentation.)
2. Mark the egg.

Using a pencil, draw some guide lines for the pattern you plan to make on your egg. You can draw simple lines to help keep your pattern straight, or you can sketch your complete design right on the egg. (The pencil lines will be removed later.)

Next, place a mini drill bit in your Dremel tool. (Oddly, the bits I have are not labeled with sizes, so I can’t recommend what size to get. Just look for tiny bits that are slightly larger than an embroidery needle.)
Begin to drill holes in each spot where your needle will be inserted. This is really the only tricky part of this whole project because the smooth surface of the egg makes it a little difficult to drill precisely, as the drill bit wants to slide around on the surface of the egg. But again, just practice until you get comfortable, and your results will improve. Otherwise, the drilling is easy. And believe it or not, the egg stands up to it very well. I didn’t have anycracking or breaking while I was drilling!
Once you’re all drilled, wipe the surface of the egg with white vinegar and a paper towel, and the pencil marks will come right off.
3. Embroider the egg.

Load your needle with 2 or 3 strands of embroidery floss, and knot the end of the floss. Then simply start sewing on the egg by bringing the needle up and down through the pre-drilled holes.


When you finish a color, leave the end of the embroidery floss hanging (it will be finished off later).


When your image is complete, all that’s left is to secure the ends of the embroidery floss. Unless you’re a surgeon, it would be very difficult to knot the ends of the thread inside the egg. So instead, secure each thread with a drop of glue on the inside of the shell. When the glue is dry, trim the end of the thread.
And you’re done! The possibilities are really endless with this technique — try dyeing your eggs before embroidering them, embroidering names or monograms or using other stitches. Have fun and happy spring!


Let’s make ’em!
Materials
- contact paper or adhesive vinyl
- scissors and craft knife
- optional (but it makes it a whole heckuva lot easier): Cricut cutting machine
- eggs
- craft paint
- paintbrushes
- tweezers
Make Time: 1 Hour (Plus Drying Time)
I’m not gonna lie. I’ve been doing lots of cutting projects lately and while you totally could do them by hand, they are so much better and so much easier if you use a Cricut machine. No joke, cutting all of these words took about 3 minutes with the Cricut. By hand I’m sure it would have taken hours. But I digress.
Cut out your letters in phrases that you love. If you like mine, you can download the file right here! Upload it to the Cricut design space and cut, or print it onto your vinyl and cut out the letters by hand. Set your letters aside.
Hard boil your eggs and dye or paint them. I chose to paint these because I wanted really opaque, saturated colors. Just cover them with a coat or two of paint and let them dry thoroughly.
Stick your letters onto your eggs! It can help to use tweezers for placement if your letters are extra tiny. Press the letters into the eggs to be sure that they adhere thoroughly.
Hide these dudes all over the yard and make your family hunt for them! Or just take pictures and Instagram the pants off ’em. Either way, you’re pretty much gonna win at Easter. I said a hip, hop… xoxo
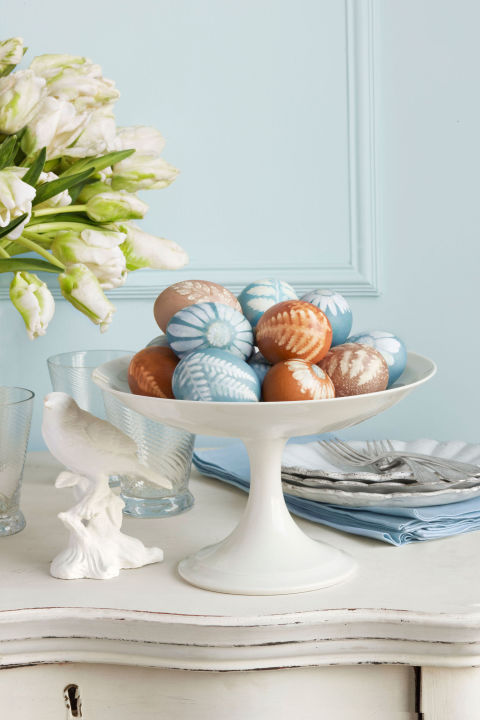
DIY Dyed Robin Eggs

One of my favorite colors is robin’s egg blue. I think the difficulty in recreating the color using dyes and food coloring makes it all that more attractive to me. Only Mother Nature can produce a blue that spectacular. So it only makes sense that the magnificent turquoise hue can be replicated using a single product of nature: red cabbage. That’s right. Red cabbage! You won’t believe it until you try it. And I promise if you haven’t dyed eggs with natural dyes before, you’ll be hooked after trying this.

You’ll need:
- a dozen white, hard boiled eggs
- 1 head of red cabbage
- 4 tsp of white vinegar
- edible metallic gold paint
- thick bristle paintbrush or old toothbrush

Start by roughly chopping a head of red cabbage. Put the cabbage in a large pot with 5 cups of water. Bring to a boil and then simmer for 30-45 minutes. Allow the cabbage to cool completely before straining the cabbage out of cabbage dye. Stir in 4 tbs of white vinegar.


Place the eggs in a deep baking dish and pour the dye over the eggs. You’ll want to have each of the eggs completely submerged and not touching each other. But hey – the dye is purple!! That’s right. Just wait. You’ll only have to wait as long as an hour to see the magic happen.


For a lighter robins egg blue, you only need to leave the eggs in the dye for about 1-2 hours. Because the bottom of the eggs make contact with the baking dish, you’ll want to rotate the eggs every half hour or so. When you pull an egg out of the dye, after 1-2 hours, you’ll notice the color will look super faint. It’s okay. The color will darken and develop a richer, greenish hue as it dries. I know, magic.


I wanted an ombré of blues so I took a few of eggs out after an hour, after two hours, after three hours and after four hours. If you are going to leave the eggs for longer than that, or overnight, I suggest putting the eggs and dye in the fridge.


Once the eggs have dried completely, you can leave them as they are or spray them withedible gold paint for a pretty speckled effect. Lay the eggs on a few sheets of paper towels. Dip a dry bristle brush or old toothbrush into the paint and run your index finger along the bristles above the eggs. Let the paint dry before splattering the opposite side.


Your edible, robin eggs are finished!


Happy Easter
Easter Bunny Eggs
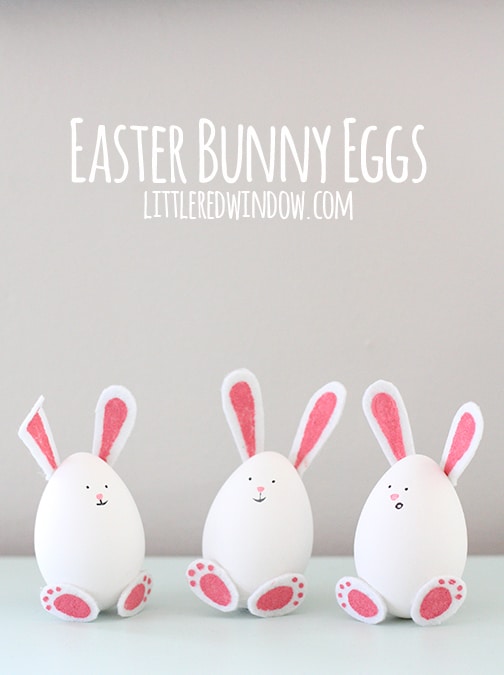
Easter Bunny Eggs
Craft Eggs (If you can’t find the kind I used, just get something like this and paint it white)
White stiffened felt (you could also use cardstock)
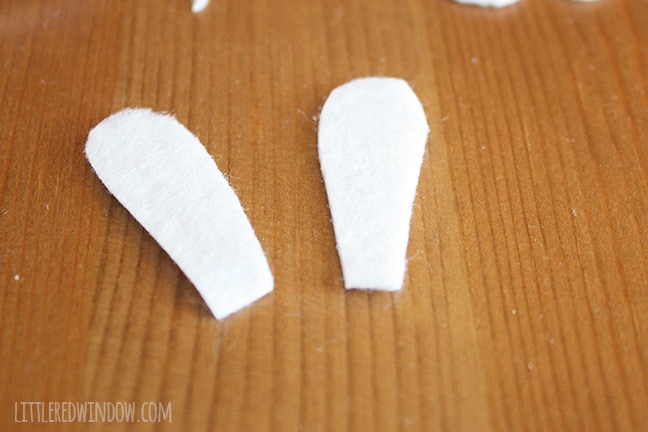
1. First, using scissors, I cut out ears shaped like this from the stiffened felt, mine are about 1 1/4″ long.
 2. The felt I used had one side that was slightly smoother, so I painted pink inner ears on that side using a small paintbrush.
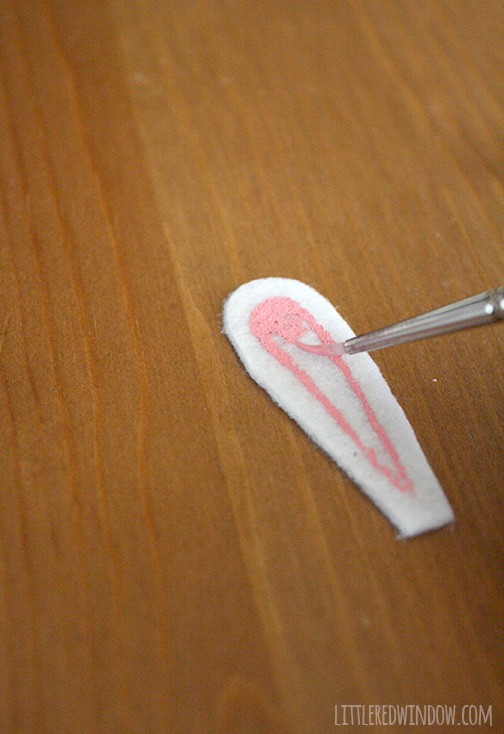 3. Then I cut small ovals for the feet. These are about 3/4″ long and 1/2″ wide.
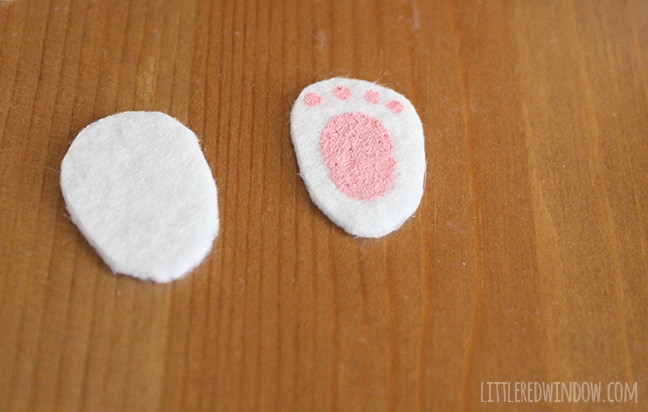
Here’s my ear and foot assembly line…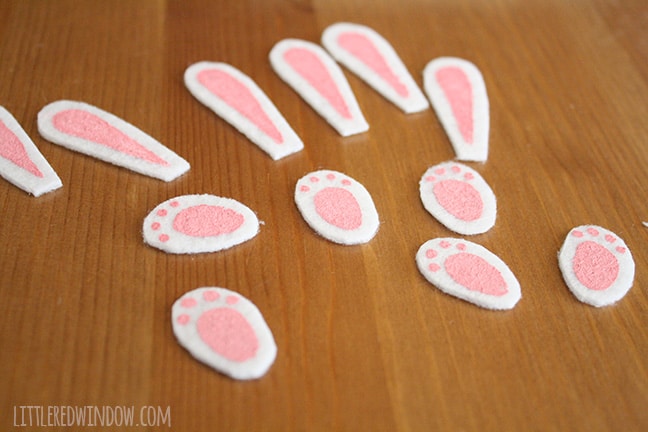 4. Then, using a very small brush, I gave the bunnies cute faces.
4. Then, using a very small brush, I gave the bunnies cute faces. 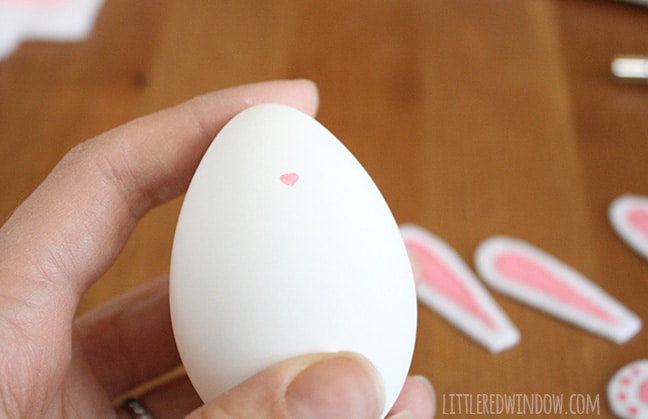
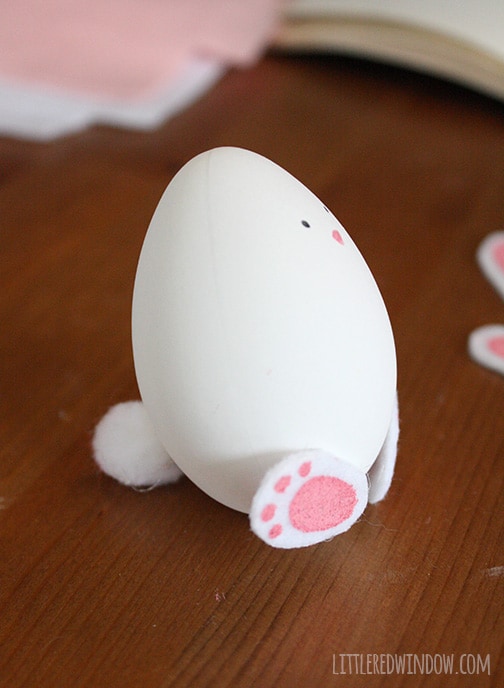
5. Then, using hot glue, I glued the feet to the front of the egg. Make sure they touch the table, they help hold him up.

6. Then while the egg is sitting on the table (you still have to hold it up at this point), glue a small pom pom to the back for the tail. Now you should have two feet and one pom pom touching the table which should keep your bunny egg upright!
7. Finally I added the ears! I bent the very bottoms of the ears back a little so the ears stood up straighter. And if you want to make one floppy, go ahead!
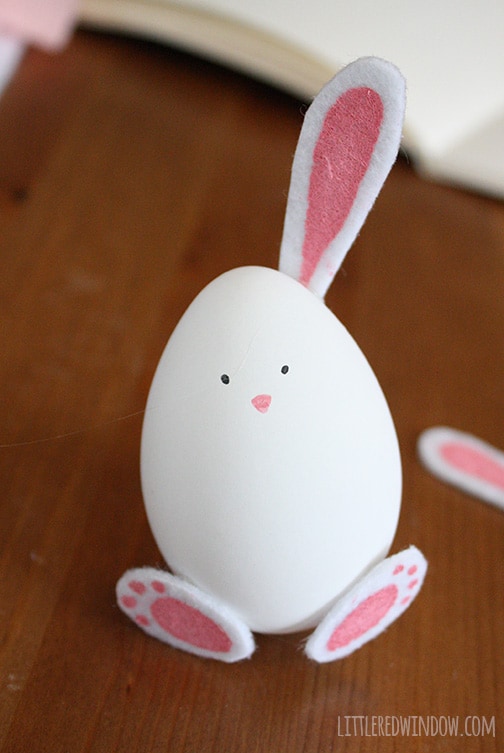
And that’s it, your little Easter Bunny Eggs are ready for Easter morning! They look so cute on a mantel or shelf!
dye-eggs-with-whipped-cream
dye-eggs-with-whipped-cream

This year I wasn't planning on dying eggs however I was instantly intrigued by this way I found while browsing around on Pinterest. Instead of using any chemicals or elaborate methods that take a whole day to dye a dozen of eggs, this one only needs some whipping cream and a few drops of food coloring!
The results are by far my favorite. The eggs look like a beautiful water colored painting!
Scroll below for the method and photos of how to dye your eggs with whipped cream!
I used a dozen of eggs as they are more than enough since we are only two people. The beauty of this method is trifold.
1. By using whipping cream and food coloring the eggs are completely safe to eat.
2. Time needed from start to finish is less than half an hour with preparation.
3. You can dye multiple dozens of eggs in the same time frame.
With all these pros plus the fact that the eggs look absolutely beautiful I don't think I will ever use a different method of dying them ever again.

How to Dye Eggs With Whipped Cream
Ingredients
1. 1 large tub of whipped cream
2. Food coloring in different colors. (Gel works better resulting in a brighter egg)
3. Boiled white eggs
4.White Vinegar
Preparation
1. Hard boil your eggs and let them cool completely
2. Fill a baking dish or any porcelain dish with the whipped cream.
3. Drip food coloring all over the whipped cream.
4. Using the toothpick swirl the whipped cream to combine the colors slightly.
5. Place the eggs in the whipped cream and gently roll once so the entire egg is covered.
6. Let your eggs sit for 10-30 minutes depending on how bold you would like the colors.
7.Remove your eggs from the whipped cream using gloves and rinse them quickly under cool water.
8. Let them dry on a paper towel and your eggs are ready!
Tip : If you want the colors to look even more vibrant follow these steps before you submerge them into the whipping cream.
Pour vinegar into a bowl and submerge the eggs in vinegar for about 2 minutes. Remove from vinegar and dry with a paper towel.
Add a couple of drops of vinegar into the food coloring before you start dripping it onto the whipped cream.
I like my eggs with less vibrant colors as you see above but if you prefer them less pale than mine using vinegar will brighten the colors considerably!
▲
Try this method once and I promise you, you will never look back again!
Happy Easter!

 My new favorite thing is nail polish marbling. Have you tried it? The other day I decided to dip a few eggs like I did these glasses – and then proceeded to work my way through two dozen eggs. It makes me seriously wish I had more colors of nail polish!
And then I had to take roughly a million pictures. Because aren’t they just the coolest?
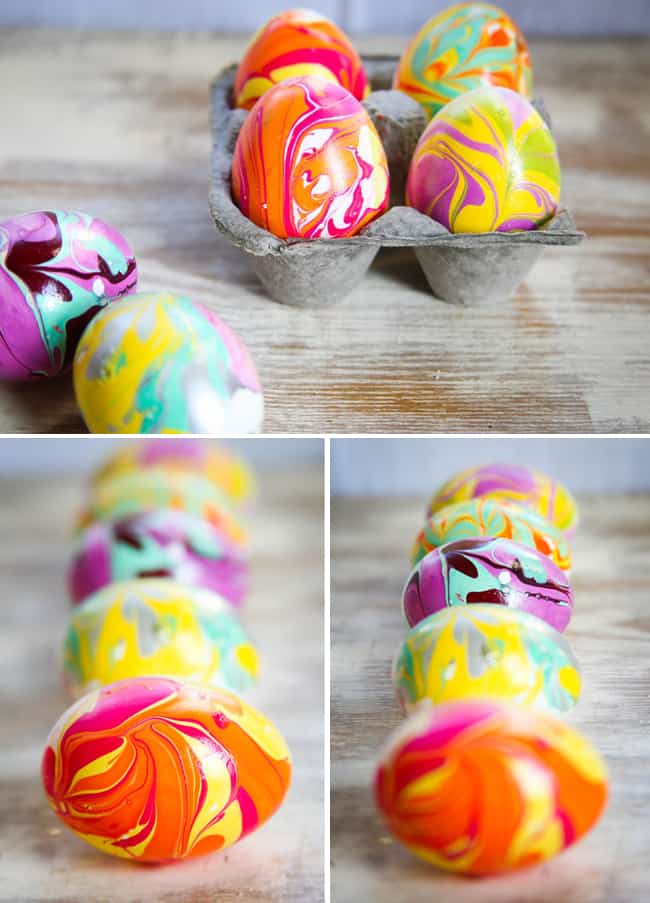
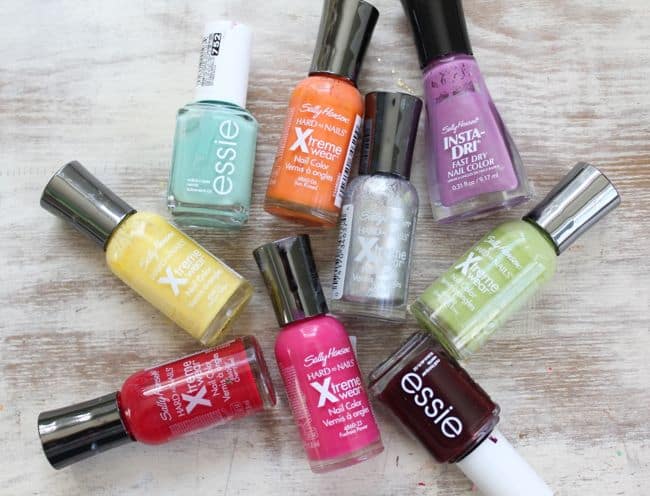
- Eggs. A lot of them. Because once you start you’ll want keep dipping.
- Nail polish in all kinds of fun shades. My Essie polishes worked fine this time, I think because I wasn’t trying to make a specific design. And silver polish was amazing!
- A plastic cup or bowl filled with room temperature water. This is very important! If the water is too cold or too hot, the polish won’t work. (In round 2 of nail polish marbling, I learned that using a larger bowl makes dipping much easier!)
- Toothpicks.
- Nail polish remover. You’ll need this to get the polish off your fingers when you’re done.
 Drop lots of nail polish into the water. If it sinks, the temperature isn’t right. You want it to spread out over the top of the water. Have fun playing with colors! Then take a toothpick and swirl the colors a bit.
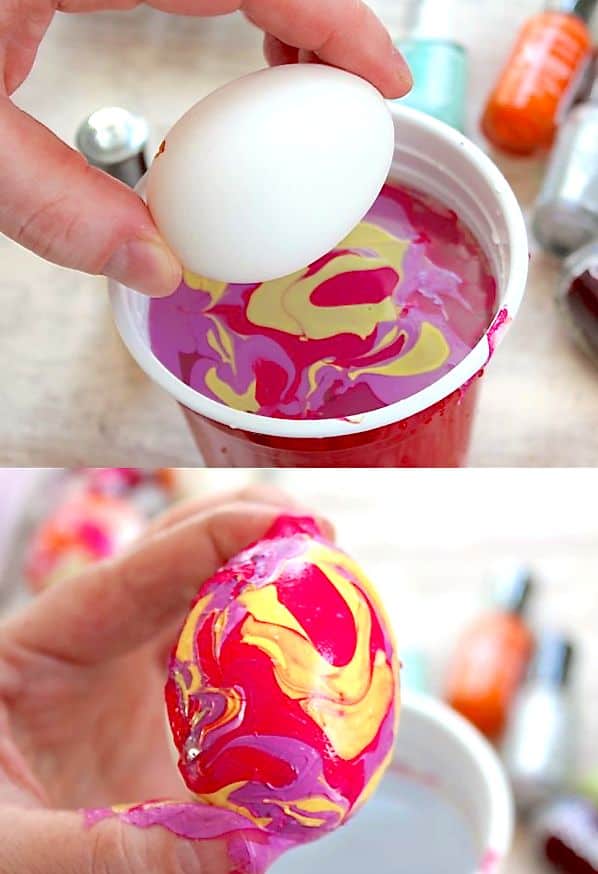
Hold your egg between your fingers so that you cover the least amount of surface area on the egg. Then dunk straight down into the water, hold for a second underwater and then bring it up.
If you use a larger container, then you can roll the egg around under the water and bring it up on the blank side so that you can cover all of the egg with polish. Sit the egg in a carton or something and let it dry.
Yes, your fingers will get a bit messy. I tried dunking with skewers or spoons and nothing worked as well as my hands.
 Have you decorated any eggs for Easter yet? I dyed some with the kids last weekend and it was really hard to share
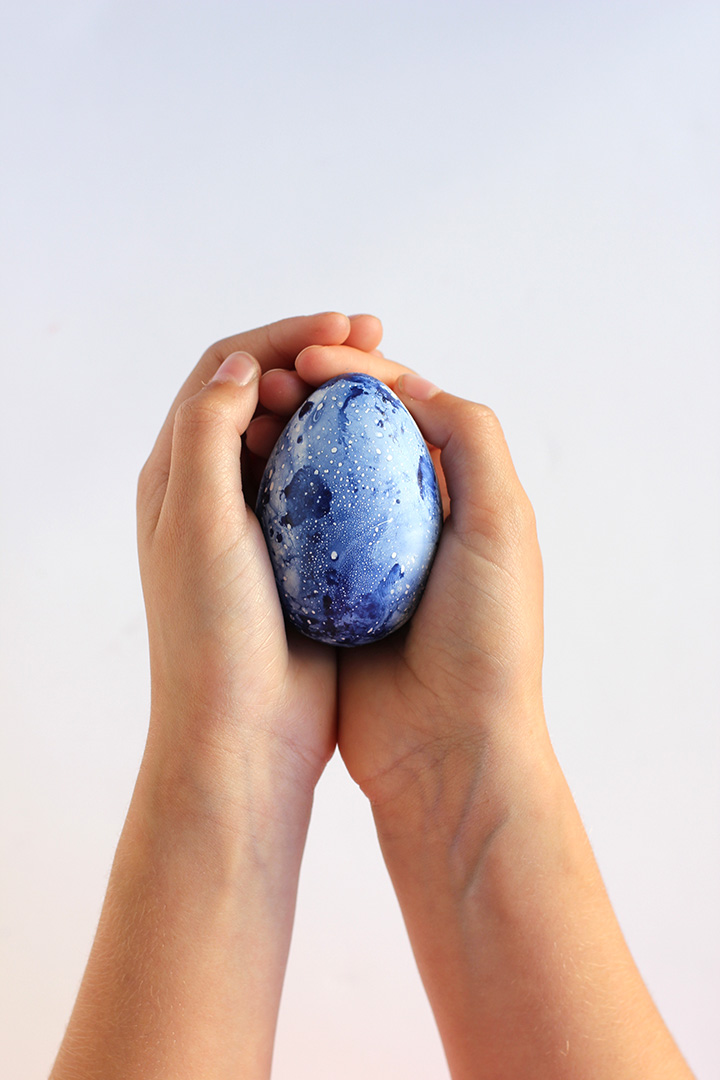

diy typography easter eggs