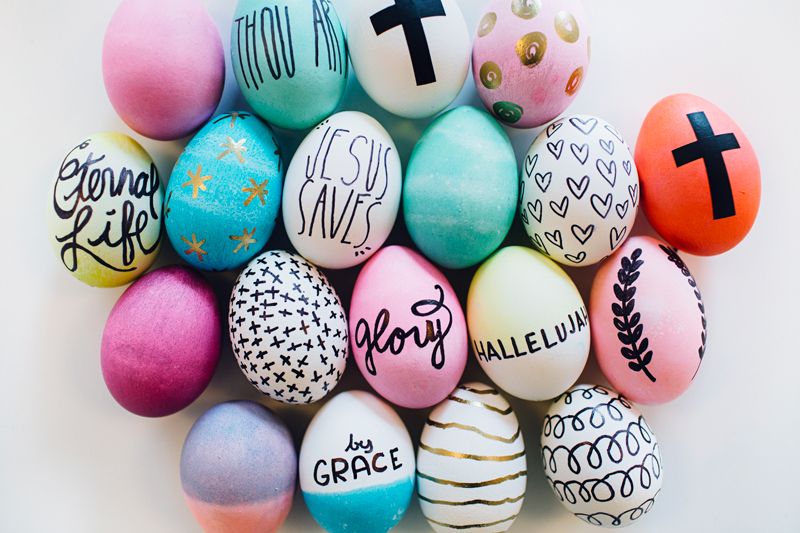
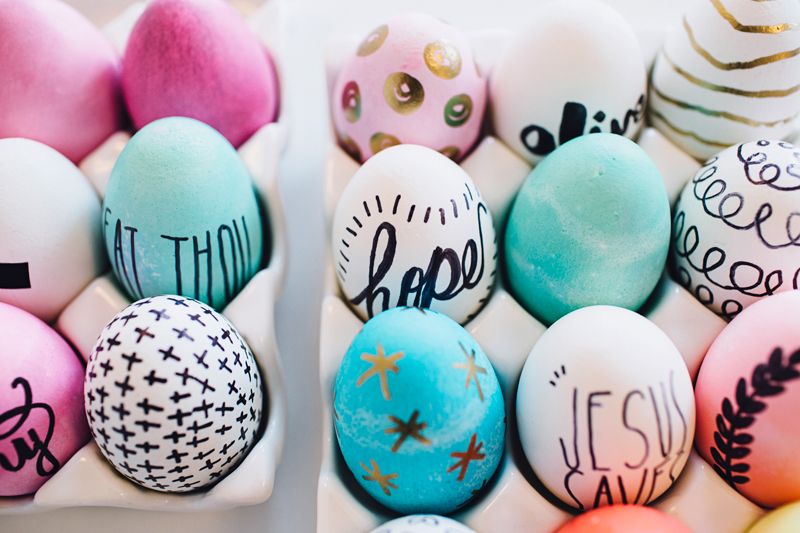
Inspirational Easter Eggs
I pretty much believe that you can make anything inspirational with a sharpie in hand. Around Christmas time we showed you guys several ideas for DIY Inspirational Wrapping Paper - and I think Easter Eggs are another great way to have fun with a seasonal tradition. Another great idea would be to give the eggs away to your neighbors and co-workers! Brighten their day and share a little inspiration with them!
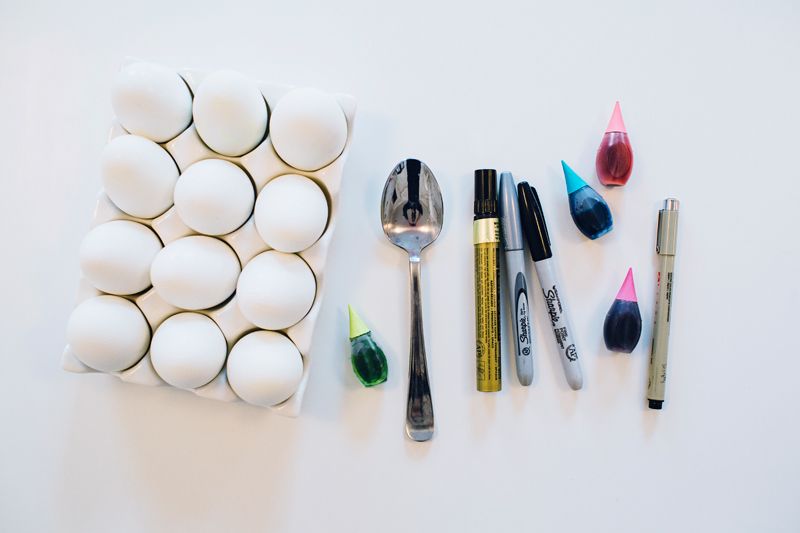

Supply List:
+ Large hardboiled eggs
+ Sharpies/Metallic Markers
+ Egg dye
+ Paper towels to keep things clean
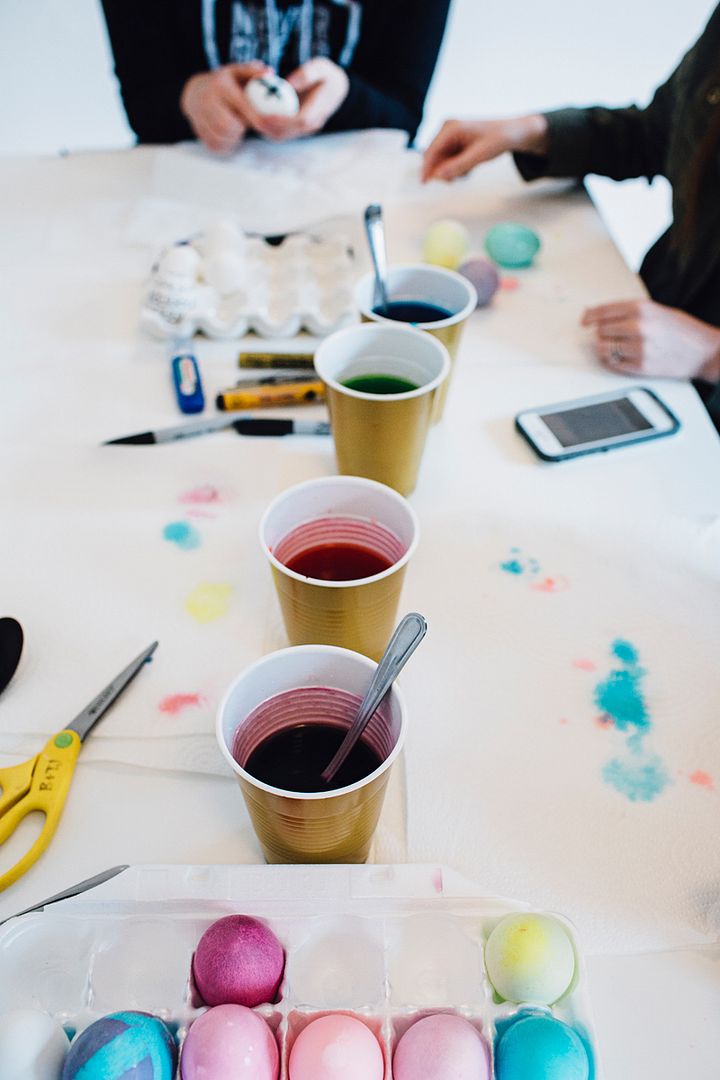
1. Hard boil your eggs. Let cool completely.
2. Dye eggs according to dye box or whatever you Google Search. Ha!
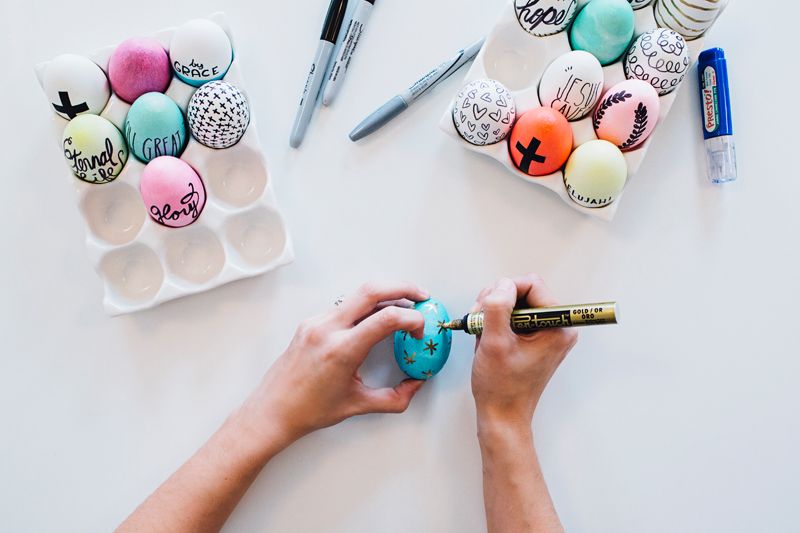
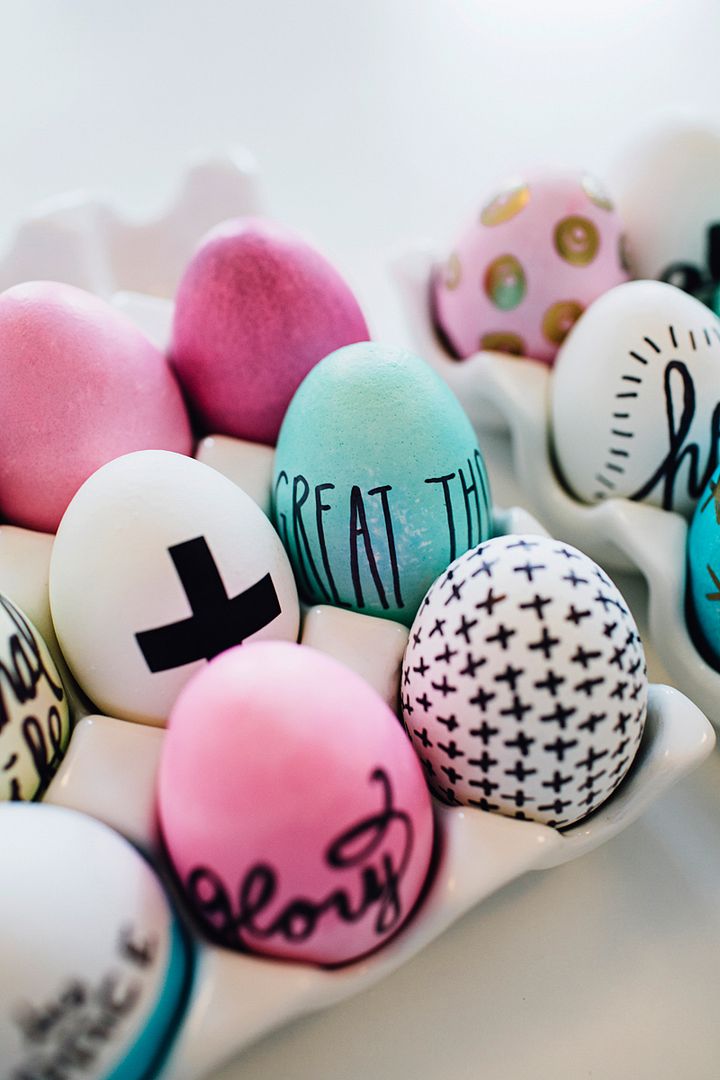
3. Start drawing patterns and phrases, over and over again on your eggs. Here are some ideas:
- Hearts, Crosses, Lines, Stars, Swirls
- He Is Risen!
- Eternal Life!
- Hope, Joy, Love, Happy
- By Grace, Hallelujah!
4. Box up 4-6 eggs and give them away to your friends!
DIY MR. AND MRS. EGG
By craft contributor Rachael

When I was a little girl, I wrote and illustrated a cute little picture book all about Mr and Mrs Egg. Now I have my own Mister, I thought it would be fun to make him a sweet little egg couple for Easter.

Wooden eggs are a cool way to store all sorts of yummy treats, and painting them is easy with the following steps.
Let’s get started with materials…

Materials:
1. Wooden Easter eggs that twist apart (You can pick them up from your local craft store)
2. Paint
3. Brushes
4. Glue
5. Scissors
6. Sharpies and a pencil for drawing on faces
7. Black cardboard for bow tie
8. Sequin for hair tie
9. Small chocolate eggs to put inside the wooden eggs
2. Paint
3. Brushes
4. Glue
5. Scissors
6. Sharpies and a pencil for drawing on faces
7. Black cardboard for bow tie
8. Sequin for hair tie
9. Small chocolate eggs to put inside the wooden eggs

Step 1: Draw your face on the top part of the egg in pencil. I found drawing the hair line first helped to make drawing the face a lot easier.
Just use two dots for eyes and a small line for the mouth.

Step 2: Color in the faces with your sharpie pens.

Step 3: Paint on your hair. I gave mine two coats.

Step 4: Paint the bottoms of your eggs in contrasting colors.

Step 5: Cut a little bow tie for your Mister.
Step 6: Glue the bow tie onto the bottom half of the Mister and the sequin on the hair of your Mrs.
Wait for them to dry and then fill with your eggs.
Your Mister or Mrs will love getting this cute surprise on Easte
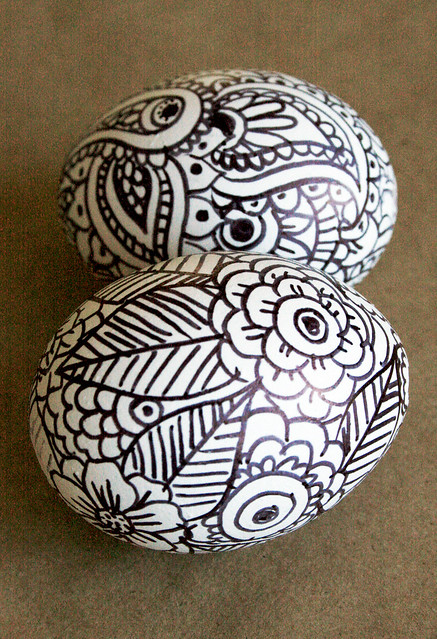
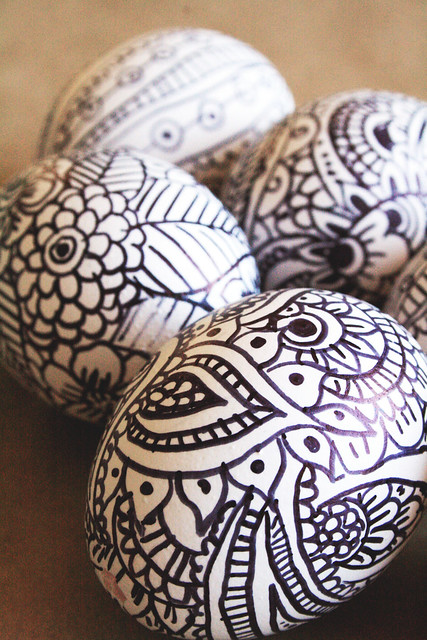
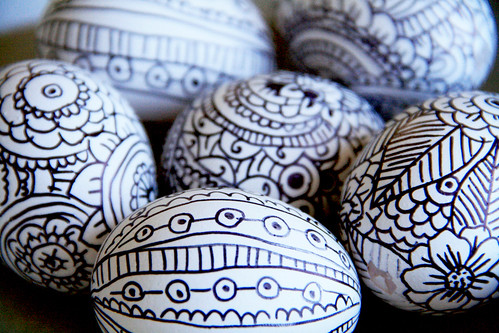
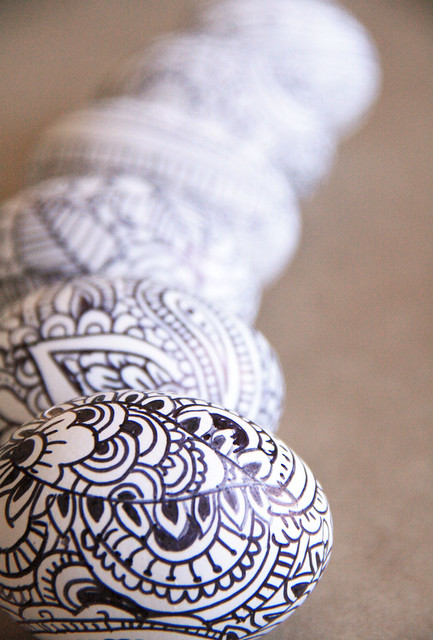
doodle easter eggs
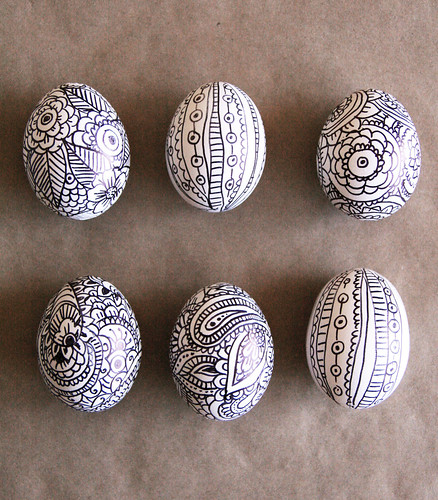
I've got lots of Easter projects to share and to start with is a SUPER simple way to create pretty eggs. Forget about color and keep things simple with black and white doodles!
I started by poking a hole and blowing out the yolk.
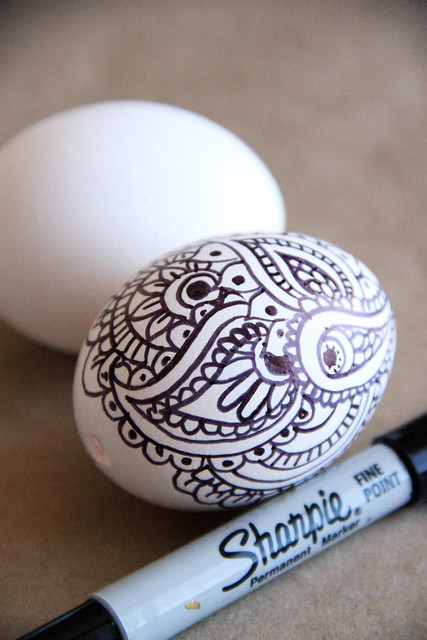
and then I went to town with my favorite supply ever- a black sharpie!
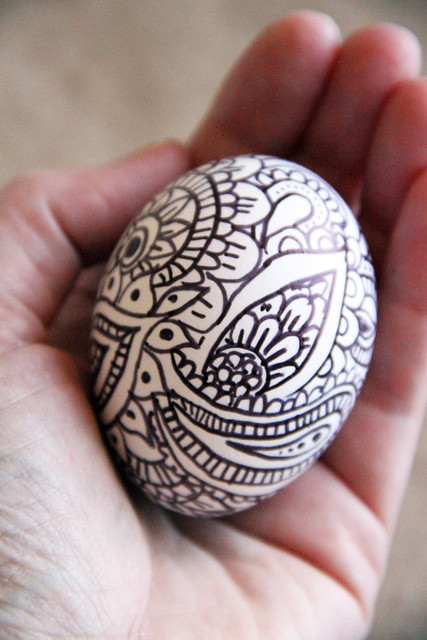
I doodled my way across the surface of the eggs with flowers, paisleys and all kinds of simple designs.
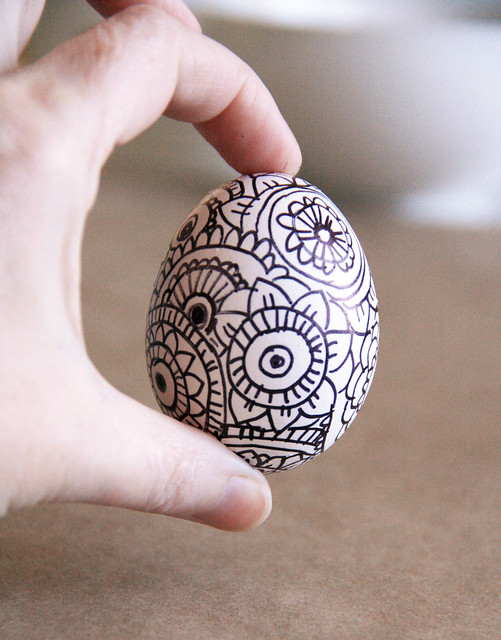
The outcome is a very simple and pretty Easter egg.
Temporary tattoos are pretty awesome. They let you feel like a tough guy without actually hurting you, especially when you’re dealing with tattoos of dinosaurs, insects, and generic action heroes. So why not give those Easter eggs a little tattoo love? Turns out, it’s just as easy to put temporary tattoos on eggs as it is to put them on you!

Materials:– temporary tattoos
– eggs
– water
– sponge
– dish towel
– eggs
– water
– sponge
– dish towel

We went with tattoos of insects, action heroes, and dinosaurs. What can we say? We’re pumped for Jurassic Park 3D.

First thing to do is prep your tattoo and place it on your egg.

Use a small sponge to apply water to the back of the tattoo. Press all of the edges down firmly. Place a dish towel over the whole egg to keep the tattoo in place. Keep adding a little bit of water. Hold for 30 seconds.

Unpeel and reveal!

Feel free to cue up Eye of the Tiger right about now ;)

Create as many as you like! We went with a dozen.

Your workspace probably looks a bit like this right about now.

And now you’re done!

We’re loving the playful look of these eggs, even if the pterodactyl got cut in half…

Put them on ridiculous gold egg stands.

Carry them to work in a basket.

Or arrange them on a tree slice.


Whatever you do, have fun with them!
How are you decorating your Easter eggs this year? Tell us in the comments below.
en I was a little girl, I wrote and illustrated a cute little picture book all about Mr and Mrs Egg. Now I have my own Mister, I thought it would be fun to make him a sweet little egg couple for Easter.
Wooden eggs are a cool way to store all sorts of yummy treats, and painting them is easy with the following steps.
Let’s get started with materials…
Materials:
1. Wooden Easter eggs that twist apart (You can pick them up from your local craft store)
2. Paint
3. Brushes
4. Glue
5. Scissors
6. Sharpies and a pencil for drawing on faces
7. Black cardboard for bow tie
8. Sequin for hair tie
9. Small chocolate eggs to put inside the wooden eggs
2. Paint
3. Brushes
4. Glue
5. Scissors
6. Sharpies and a pencil for drawing on faces
7. Black cardboard for bow tie
8. Sequin for hair tie
9. Small chocolate eggs to put inside the wooden eggs
Step 1: Draw your face on the top part of the egg in pencil. I found drawing the hair line first helped to make drawing the face a lot easier.
Just use two dots for eyes and a small line for the mouth.
Step 2: Color in the faces with your sharpie pens.
Step 3: Paint on your hair. I gave mine two coats.
Step 4: Paint the bottoms of your eggs in contrasting colors.
Step 5: Cut a little bow tie for your Mister.
Step 6: Glue the bow tie onto the bottom half of the Mister and the sequin on the hair of your Mrs.
Wait for them to dry and then fill with your eggs.
Your Mister or Mrs will love getting this cute surprise on Easter morning and the best part is, you can use them all year through to store your special things


Golden Bunnys


“I want my geese to lay gold eggs for easter!” Just like Veruca Salt, I wanted a few gold eggs for Easter, so I made it happen with some beautiful gold leaf. For my gold leaf Easter eggs, I created the world on an egg, a golden bunny and a simple heart. The heart was made using a heart sticker that I removed once my egg was covered in gold leaf. We created the bunny with an easy pencil sketch and the world I did by eye… which you can do too : ) Gold leaf is extremely delicate, so it tears easily and can stick to your fingers, but who said Easter egg decorating was clean? I had so much fun creating these eggs – I love doing creative projects that take concentration and focus. They let your thoughts rest and your right brain go to work! It’s kind of like yoga for the brain, haha! I’m in love with how these turned out. They’ll be a beautiful addition to my Easter decor this year.
Using gold leaf glue, a paint brush and a pencil, draw your design.
Paint it in with glue and then place a sheet of gold leaf over the top. Lightly tap it (it might lift, but that’s okay because you can fill the holes in later) and then give it a second before lifting the edges up. Your design will pretty much be laid in, but you’ll need to do a little touching up and cleaning around the edges.
*Tip: You can also do this on wooden eggs for a decoration that will last a little longer ; )
This is what you need:
Dye + plastic spoons. I used this dye, but I’m sure food coloring would work just fine. You need vinegar, and water to prep your eggs, and a baking sheet, or metal tin to collect the run off dye. The secret to these is to make a dark color version of dye, and then a lighter. I just added 50% more water to the existing color to make a lighter version.
First prep your eggs. Get a bowl, mix 50% water and 50% vinegar and wipe the eggs down with the mixture. Dry em. Then grab you spill collector. Start with the lighter colors. Its all about layering dark to light. Hold the egg over the tin on both ends, and simply pour some color over it. After you have made your pour, turn the egg in your hand so the color goes all the way around. You MUST let the color completely dry in between the pours. I used a blow dryer to speed things up. Once your egg is dry, repeat with another light color, or a darker one. This part is where you can get crazy. You can do a lot of pours, or a little.
*See that little white plastic circle in #2? Thats a water bottle cap. It makes a great holder to dry your egg on.
** I didn’t wear latex gloves in the picture, but you probably should. :)
graffiti-inspired-easter-eggs

what you’ll need: blown or decorative eggs (can use hard-boiled as long as you don’t eat them afterwards) / acrylic craft paint / paint brush / metallic paint pens
How to make it: Follow the instructions here from my project for Easter eggs inspired by impressionists – painting random patches of color around the entire egg. NOTE: Instead of leaving space between the patches of color, like in the Painterly Easter Eggs DIY, cover the entire egg with paint. Once dry, outline the random patches of color with a metallic paint pen, creating different shapes. Add decorative elements like polka dots or stripes in different areas. Wait for the eggs to dry.
Easy Silhouette Easter Eggs

If you have some white tissue paper, Mod Podge, a glue stick and a printer, you can make Silhouette Easter Eggs without spending a penny!
Materials
Eggs (hard boiled if you plan to eat them, or blown if you want to keep them)
White tissue paper (ironed flat if it's wrinkly)
Silhouette images (I used the beautiful free images from The Graphics Fairy)
A sheet of copy paper
A glue stick (I like the Elmer's Craft Bond Repositionable)
Scissors
Mod Podge
Paint brush
An old gift card or club card to use as a refining tool

Step 1: Find some silhouette images that you like. I found mine from my favorite source of free vintage graphics, The Graphics Fairy. Copy the images and paste them in to a word processing document. I resized my images to approx. 2" high (or wide for the horizontal oriented graphics).

Step 2: Run your glue stick along the top edge of a piece of copy paper.

Step 3: Lay a piece of tissue paper on top and press to adhere along the glue line.

Step 4: Trim tissue paper so that it is the same size as the copy paper. Feed in to printer so that document will print on the tissue side (glue end first). Print silhouette document using a "DRAFT" setting. This will avoid saturating the tissue with too much ink, which could bleed later in the process.

Step 5: Cut a silhouette from the tissue paper, trimming tight to the edges with just a slight white border.

Step 6: Brush Mod Podge of the section of the egg where the silhouette will be applied. Apply tissue silhouette, upside down so that the ink side contacts the glue and egg.

Step 7: Brush Mod Podge on to of the tissue silhouette, using the brush to flatten the tissue and work out any air bubbles or wrinkles. You can also use a finger, gently, to smooth out the tissue. It took me an egg or two to perfect the technique. Don't get discouraged. A few wrinkles is okay. You'll buff them out in a later step. Set egg aside to dry.

Step 8: When Mod Podge has dried, use the edge of an old gift card or store club card to smooth out any remaining wrinkles.
THE PRETTIEST EASTER EGGS...
While lunching with my neighbor Elisa a couple months ago, she told me about the colorful Easter eggs she whips up every year. So just in time for this weekend's festivities, I had to share these colorfully patterned eggs with you! The eggs in the bottom photo were dyed traditionally using Ukrainian dye and tools, including beeswax and candles, while the top image eggs were simply covered with chap stick and dipped in different colorful dyes. So fun! Thanks Elisa!
MAKE THIS: POLKA DOT THUMB TACK EASTER EGGS

Make a set of shiny, polka dot eggs like the ones above with just two supplies: hard boiled eggs (I used brown ones) and metal thumb tacks. That’s it. You can get the thumb tacks at any craft store or on Amazon.
Step by Step: This is so simple, you probably don’t need any instructions, but I’ll share ’em anyway… Once you’ve boiled your eggs and they’ve been cooled, you can slowly push thumb tacks in one by one. You want to careful not to push too hard or the egg shell will crack. I found that a back and forth motion as I was gently pushing each tack through worked the best. Continue the process until your egg is completely covered. Depending on how flat the underside of your push pins are you may need a few dabs of glue as well. But I made a half dozen eggs and had no trouble with the pins staying in place without glue.
NOTE: This project is for adults only and is not intended for use around young children.

And here are the finished eggs…

Square-Patterned Eggs

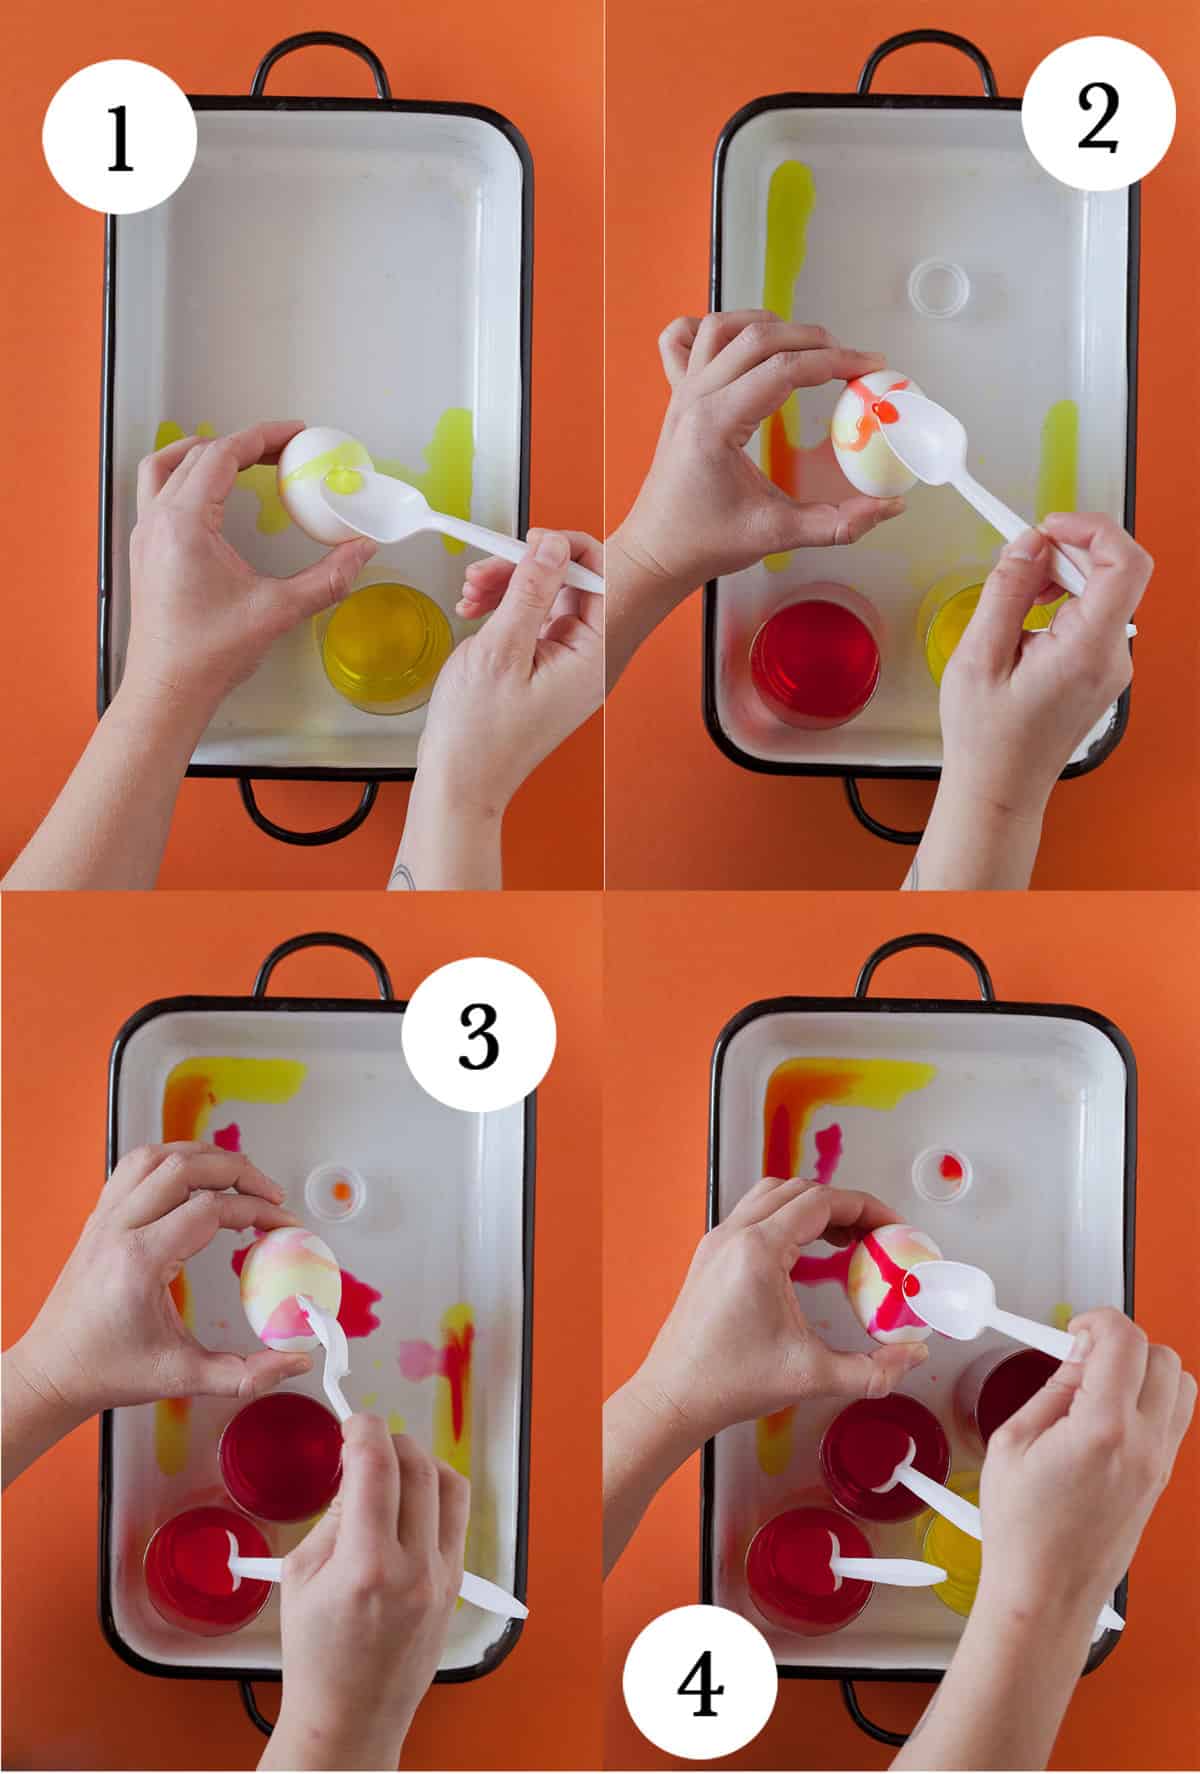
MARBLEIZED EASTER EGGS
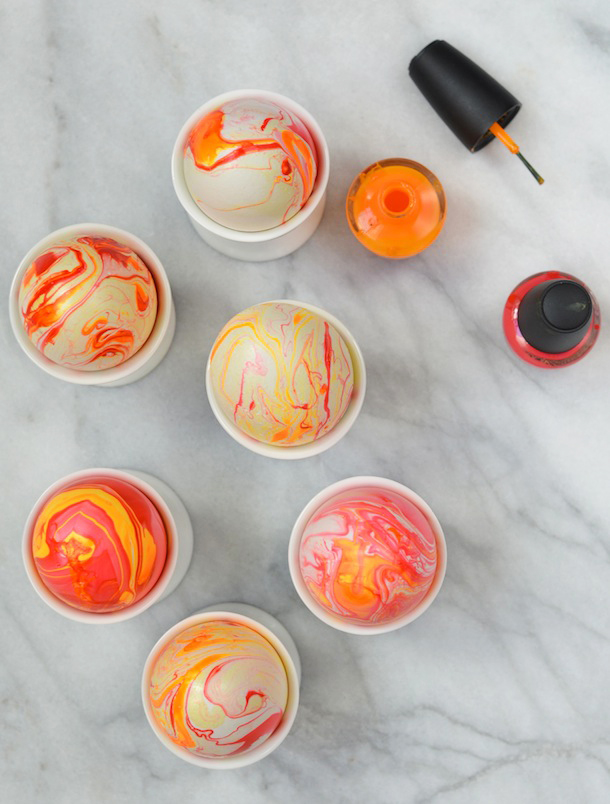
Ever since coming across this DIY on Design Mom, I’ve been waiting for just the right opportunity to do some major marbling. When I sat down to brainstorm projects for the upcoming Easter holiday, I thought about how the vivid shades of nail polish would be perfect for marbling Easter eggs… and didn’t they turn out pretty? Making these is rather addictive: I couldn’t stop playing around with different color combinations and dipping just about everything in sight into the swirly waters. But the most fun part was seeing how each egg turned out completely different. Keep reading to see how it’s done!


- Pour a few drops of each nail polish color onto the water surface. Be sure to experiment with the step as the order you pour the colors results in varying marbleization.
- Use a stick to swirl nail polish around.
- Carefully submerge the drained egg into the water until completely covered, then quickly pull out.
- Set egg aside to dry. Scoop out nail polish from water surface between eggs, and repeat steps 1-4 for each. tip: create an egg drying rack like the one pictured by poking t-pins through a thick foam board, about 1.5-inches apart.


- cess water.

- Let dry a few minutes; repeat with additional decals. Try multiples of the same design, or a collage of different images.

- Let dry overnight, then spray with a coat of varnish.

Pattern on Easter Eggs
These graphic eggs take a design cue from the printing press, where misaligned plates result in slightly skewed, or "off-register," type and images. In this interpretation, vinyl letters or narrow strips of electrical tape are applied to an egg; it's dyed, and then the letters are shifted before the egg is dipped into a different color.
What You'll Need:
- 1/4-inch-wide electrical tape
- Food coloring
- Paper towel
- White vinegar
- Vinyl letters, by C-Thru, from duall.com


Marbleized Easter Eggs

Nestle each of your marbleized eggs in its own bed of grass. Using cardboard dividers, create 12 compartments in a shallow box or an empty shirt carton, then fashion a snug nest of dried grass inside each square. Save the lid for storage.
What You'll Need:
- Egg blower, Aunt Marge's 2-hole Egg Blower, surmastore.com
- 12 eggs
- Several mixing bowls, shallow and deep
- Measuring spoons
- Liquid measuring cup
- White vinegar
- Food coloring, including liquid brown food color, lorannoils.com
- Spoon and fork
- Olive oil
- Paper towels

Step 1
With an egg blower, pierce the top and bottom of each egg, puncturing the yolk; carefully expel the contents. Rinse, and let dry.
Step 2
In a small mixing bowl, combine 3 cups warm water, 2 tablespoons vinegar, and a few drops of food coloring. Place egg in dye, and leave it submerged until it turns the desired shade.


Masked Easter Eggs


MATERIALS
White or brown eggs
1/4-inch masking tape
Paper towels
Optional: rubber bands or small stickers
STEPS
- To make a plaid egg using masking tape, start with a white or brown egg, or dye one a light hue. Wrap 1/4-inch masking tape lengthwise around the egg for stripes; rub the tape at the edges with your fingernail for a good seal, so dye can't seep underneath. Dye egg to desired color. Blot with a paper towel. Let dry 10 minutes.

- Make stripes around the egg crosswise using 1/8-inch masking tape. Rub down tape; dye in a darker color, and dry as before. Remove tape.

- For other design options, use rubber bands or small stickers (such as dots, stars, and ring-shaped paper reinforcers, available at office-supply stores; big stickers won't lie flat on the rounded surfaces of an egg).

- You can also grace eggs with the delicate shapes of greenery. You'll need an egg white, small leaves or sprigs such as those from various herbs, a tiny paintbrush, a nylon stocking, string, dye, and paper towels.
- Apply egg white to the back of a leaf with the paintbrush, place the leaf on an egg, and press gently with fingers. Cut stocking into 4-inch squares. Lay egg in center of square and pull nylon around it, stretching it taut; tie with string. Submerge egg in dye for 5 to 10 minutes. Remove egg, and blot with a paper towel.

- Snip string, and unwrap nylon stocking to check color. If egg isn't the desired hue, retie, and dye again. When the desired color is achieved, remove nylon; peel away leaf carefully. Blot with a paper towel, then dry egg on paper towels for 10 minutes, leaf side facing up.

CALLIGRAPHED EGGS DIY + FREE TEMPLATE
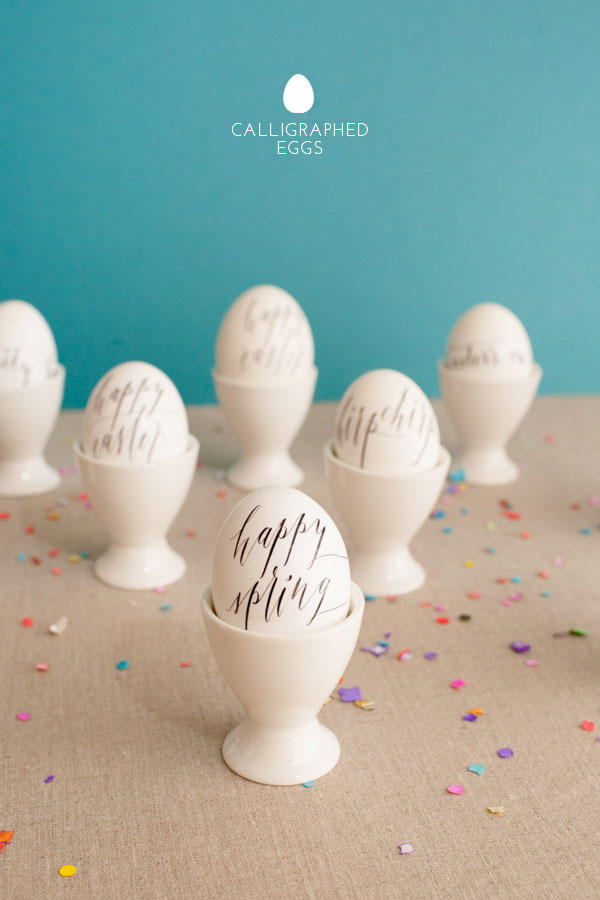
Material: Tattoo paper, scissors, hard boiled eggs, small bowl, water, paper towel
Step 1: Download the template—yes! It’s supposed to be reversed—and print it out onto temporary tattoo paper (we used Silhouette Printable Tattoo Paper from Paper Source.)
Step 2: With the print out in hand, closely follow the instructions provided on the tattoo paper packaging for proper application of the adhesive sheet.
Step 3: Cut out one tattoo, remove the clear plastic layer, and apply with a very wet paper towel to a hardboiled egg, again referencing the tattoo paper instructions for additional application details.
Step 4: Remove the paper backing and voila, a calligraphed egg!

Photo Print Easter Eggs
Photo Print Easter Eggs


Create a lasting memory this spring by adhering your beloved family photos onto Easter eggs. It is the kind of project that will make you smile to think of, and absolutely giddy to see completed.
Use the photos as seating cards for Easter brunch, hide them around the house for each family member to find their own, or close them up in a carton of eggs for an early morning surprise! Make a dozen for the grandparents and deliver them Easter week, or make one for each co-worker and leave them in the employee fridge for a spring break treat. The opportunity to put these easy photo eggs to good use is endless.

To make the photo print Easter eggs you will need a dozen eggs, photos that you love, an inkjet printer, masking tape, and tissues (the kind you sneeze on).
Hard boil your eggs and let completely cool. Meanwhile, tape a piece of tissue onto a normal printer paper. Tape all the way around the tissue – being sure not to leave an end unattached. Use the tissue taped paper to print your photos onto. As long as it is taped fully around, the paper should run right through any inkjet printer.
Cut around the photo shapes, no need to be exact, but get as close as possible. If the tissue is more than 1ply the bottom layers should slide away once the shape is cut out. Only apply the top layer of tissue to the eggs. Use a small brush to place Modge Podge on the egg and then the photo on top. Gently even out wrinkles with a finger and gently secure the ends with another layer of Modge Podge.
Let the eggs dry. Once the Modge Podge dries, the tissue layer is so thin you won’t be able to tell where the egg ends and the photo begins – the eggs look like portraits in themselves!
DIY Ombre Easter Eggs


DIY Ombre Easter eggs – I’m in love!! I have been so busy lately that I haven’t done too many Easter crafts, yet alone even decorate for Easter!! With some of my family visiting this weekend and me hosting a small Easter breakfast, I decided it was time to make an Easter decoration and of course it involves dying eggs! It’s an easy project that can be used to decorate a mantel or as a centerpiece for a long table. I chose one color of dye and created a variety of shades by leaving them in the colored water for different amounts of time, creating the ombre look. Try 30 seconds, then 1 minute, 1:30, 2 minutes and so on. There’s no exact science, so have fun!
I’ve had the adorable cupcake stands for awhile now (I bought them from here) and thought they were the perfect size for the eggs to sit on, with a nest of paper Easter basket stuffing ; ) You can use any color to create this look… have fun with it! Happy, Happy Easter!! Can’t believe it’s here already! I used my Wilton food coloring gel in pink rose to dye the eggs.
Easter Eggs Mix & Match Sculptures
Are you busy on pinterest finding all the amazing easter egg decoration ideas?
Whatever you do to your eggs, here’s a fun idea for the whole family to make even more out of your beautifully decorated eggs. Whether your eggs are painted, dipped, dyed, glittered, sprayed, papier-mache’d, washi-taped, you can draw some faces on them and create these mix & match style egg sculptures kids will love playing with.
Read on for a step-by-step tutorial and also my favorite links for Easter egg decorating ideas.


I made them with hollow egg shells with holes so they can be skewered. However, if you want to use hard-boiled eggs, you can still make a great Easter egg centerpiece on your table by cracking small holes at each end and using clean skewers to make the sculptures in the same way. I thought using boiled eggs would make pushing the eggs on and off the skewers repeatedly a little trickier than empty shells… but why not.
If you want to use wooden eggs or plastic eggs, you could glue small magnets on both sides of each egg so they can be stacked on. I haven’t tried this yet, but I think it will work.
If you want to use wooden eggs or plastic eggs, you could glue small magnets on both sides of each egg so they can be stacked on. I haven’t tried this yet, but I think it will work.
If you’re going to try this with empty egg shells, here’s a little tip.
How to empty the eggs
This is not an exciting part, but just think about lots of funs to be had later.

1. Use a small kitchen knife or any thing with a sharp end. Mark the centre of the egg on both sides (either vertically or horizontally) with a pen and tap with the knife very lightly on it. Tap, tap, tap gently until the egg starts to develop a small pinhole. Tap away the sides until you have a large enough hole for the skewers. Be generous with the hole sizes so it’s easy to empty and easy for kids to put the eggs on the skewers.
2. Once you have good size holes on both sides, hold it over a bowl, stick a skewer inside and stir it to break the yolk. Move the skewer in and out repeatedly until all comes out. I was told blowing the egg works well. As soon as I blew into the hole, the raw egg white deliciously sucked back into my mouth. So don’t try this, especially with a full egg. (But you can tell someone else that it works ha ha…)* Rinse well and dry.
Now, make the stands.
Make small mounds with flat bottoms using craft clay and stick the skewers in the middle, standing straight up. You can also drill holes in small wooden blocks or any recycled material around the house that’s suitable.

Make small mounds with flat bottoms using craft clay and stick the skewers in the middle, standing straight up. You can also drill holes in small wooden blocks or any recycled material around the house that’s suitable.
Once the eggs are fully dry, the fun starts!
Decorate your eggs in anyway you like. We just painted them with acrylics but there are so many fun ways to go.
You can dip-dye in neon food colorings, or dye with natural material for warm and sophisticated tones.
Make fun ombre dye or dip in gold paint.
Cover with glitters all over.
You can of course use papier-mache eggs instead. This would be an especially good idea for younger kids because they won’t crack.
Make fun ombre dye or dip in gold paint.
Cover with glitters all over.
You can of course use papier-mache eggs instead. This would be an especially good idea for younger kids because they won’t crack.

Some more material ideas for kids to decorate the eggs (and links to related projects):
water color, sharpies, stickers, stamps, glitters, temporary tatoos, tissue papers, googly eyes, feathers, washi tape, yarn, fabric & felt scraps, buttons, adhesive-backed rhinestone jewels, sequins, glittered stickers, ribbons …
water color, sharpies, stickers, stamps, glitters, temporary tatoos, tissue papers, googly eyes, feathers, washi tape, yarn, fabric & felt scraps, buttons, adhesive-backed rhinestone jewels, sequins, glittered stickers, ribbons …

Have lots of fun decorating and don’t forget to make some of the eggs as faces.
Build your sculptures by sliding the eggs onto the skewers on each stand! Mix & match as you like and create many different combinations.


If you’re looking for something super simple with equal amounts of fun, check out these Easter Egg People Craft on Mr Printables!
Gorgeous Decoupage Easter Eggs
Gorgeous Decoupage Easter Eggs

Garden Party
Showcase your budding talent with some easy-to-craft blossoms.
Here's how: Cut solid-color origami paper into a range of different-size squares—2.5 to 3 inches is simplest to work with. Following instructions (download below), fold squares and cut out flower patterns. Using a small paintbrush, apply white glue to the backs of the flowers and adhere to eggs, pressing out excess glue or air bubbles with your fingers. Cut thin strips of paper to make stems and leaves.

Party Animals
Add some animal attraction with a sweet menagerie of bugs, bunnies, and ducks.
Here's how: Using the templates (download below), punch out desired shapes from origami paper using various-sized oval and circle craft punches. Adhere shapes to egg using white glue. Freehand draw details (feet, whiskers, antennae, etc.) using fine-tip permanent markers.
Tip: Place a piece of regular paper underneath the thin origami paper and punch through the two layers at the same time.

Grass Roots
Elevate pretty designs atop egg cups and candlesticks for a simple yet striking display.
Here's how: Cut three squares in graduated sizes (3, 2.5, and 2 inches) and colors from origami paper and fold, following instructions (download below). For blades of grass, freehand-cut each with pattern (also in the download below). Starting with biggest cutout, add white glue to back and mold paper onto bottom of egg. Repeat with medium-size cutout, staggering placement of the blades. Finish with smallest cutout. Top with a craft-punched butterfly, if desired.
Metallic-Sponged Egg

Rubber cement + gold paint = the most dramatic Easter eggs in the basket. Pour a little rubber cement into a paper bowl and dab a natural sea sponge in the rubber cement to coat. Pat the sponge on a hard-boiled egg, then set egg aside for 10 minutes. Dip the sponged egg into a prepared dye bath until it reaches desired shade. (Hint: Prepare dye bath with boiling water for best results.) Remove from dye bath and pat dry with a paper towel. While egg is still warm, gently rub off the rubber cement with your finger.
To create gold flecks, lightly press the sponge into gold acrylic craft paint. Working in sections, carefully dab paint onto half of the egg; allow to dry for 20 minutes before repeating process on the other side.
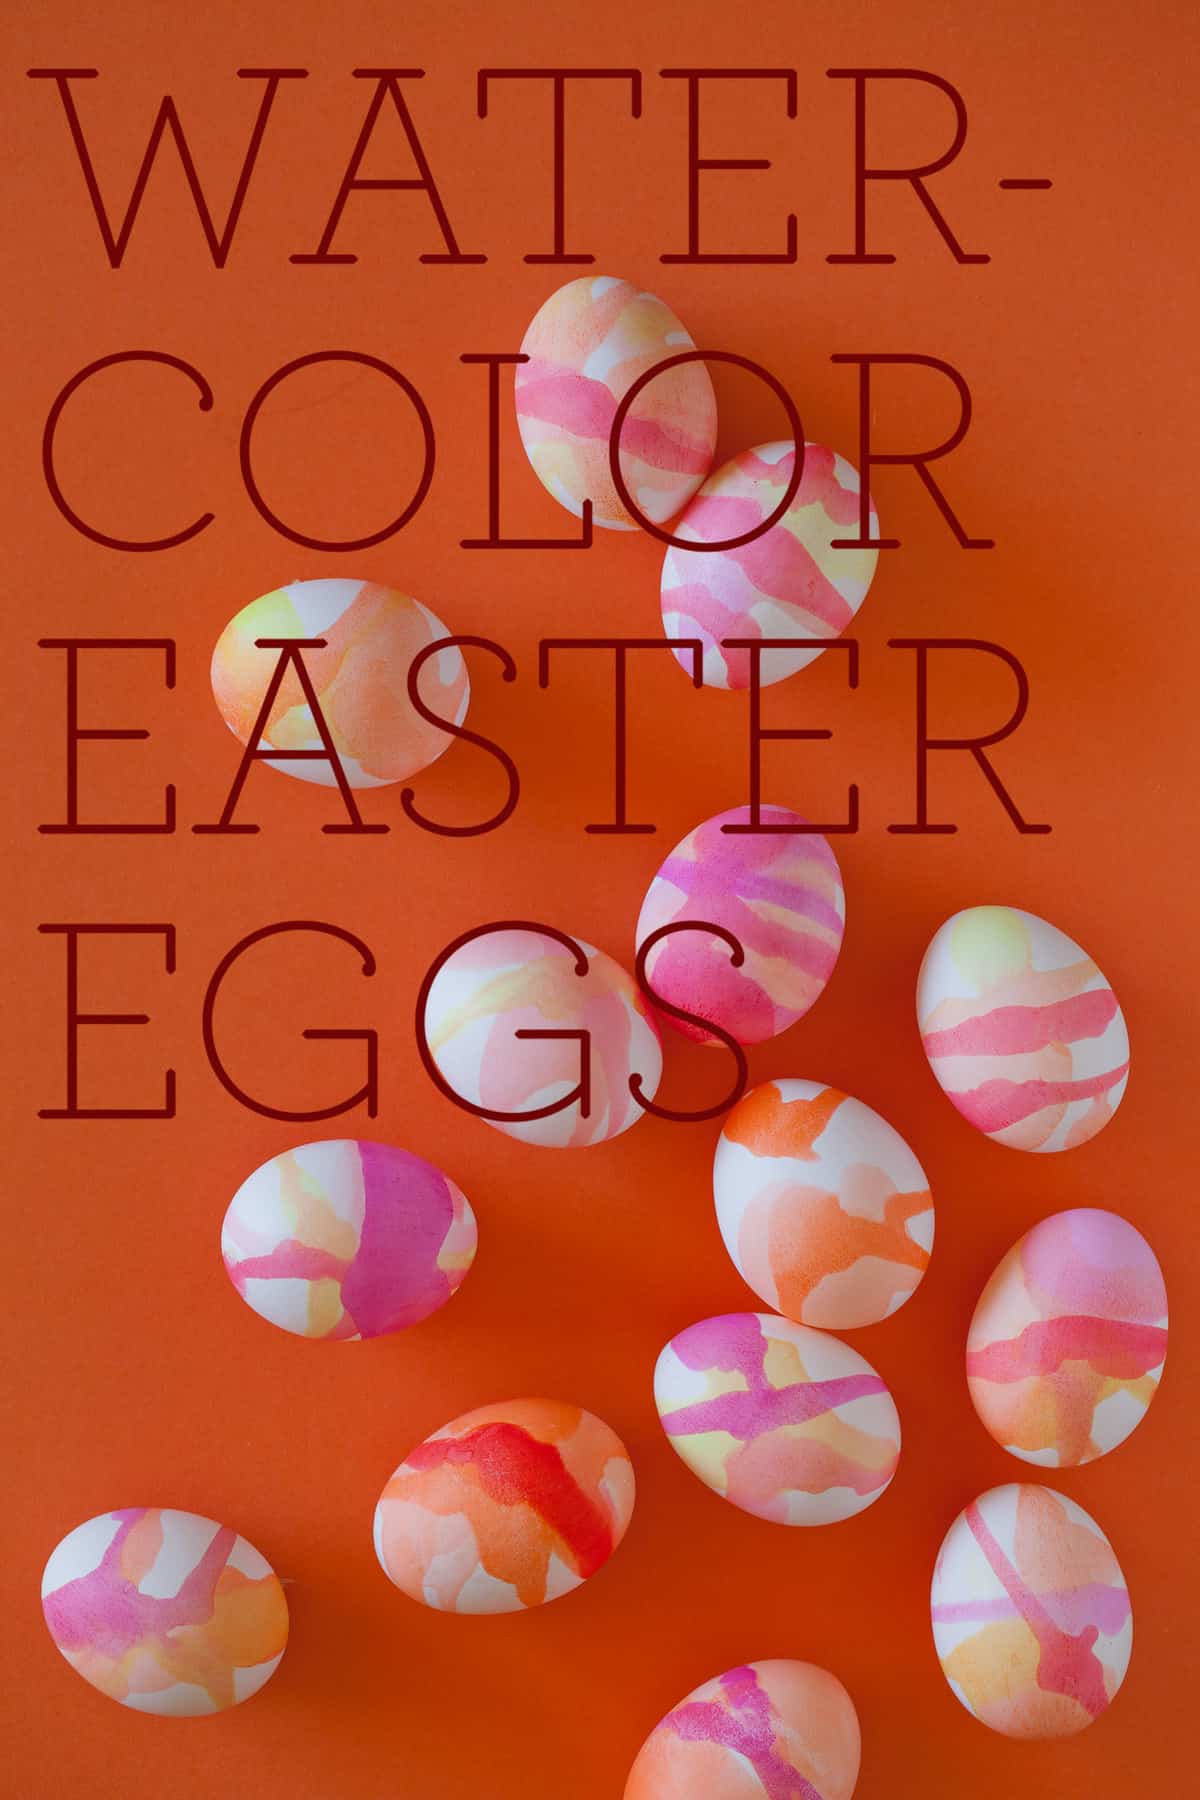
Watercolor Easter Eggs

Inexpensive watercolor paints make for a delightful day of coloring Easter eggs. For marvelous marbled Easter eggs, use a round brush or the eraser end of a pencil. Create a two-tone effect by adding water to the original color and stamping on a second round of dots.
Natural Elements Eggs

Margarine-Marbled Egg


Nenhum comentário:
Postar um comentário