


Sapatinho de bebê Morango


SAPATINHOS BEBÊ TECIDOS EM MAQUINA DE TRICÔ!!!!!!!!
LINDAS MENININHAS, TERMINEI DE BORDAR E COSTURAR OS SAPATINHOS AGORA, E NÃO RESISTI, E ESTOU DEIXANDO AQUI OS MODELITOS PARA VOCÊS VEREM !!!!!

Nao sei quem fez esse sapatinho,achei nos meu passeios pelo picasa...


 e
v
e
v
.jpg)
.jpg)
.jpg)
.jpg)
.jpg)
.jpg)
.jpg)
.jpg)
.jpg)
.jpg)
.jpg)


Nao sei quem fez esse sapatinho,achei nos meu passeios pelo picasa...


e
v
.jpg)
.jpg)
.jpg)
ی بافتنی بچه گانه


Sapatos holandeses 2 cores do bebê
Fontes:
Fios e agulhas n º 2 2.5
Produção:
- Instale 30m (AIG Não. 2.5)
- Trabalhar 66rgs liga
- Na linha 66, 13m parar mais cedo e terminar rg rg
- * Alterar a cor e continuar em meia estes 17m em 4rgs começando com RS lugar
- tomar 1 ª lugar a cor e fazem 1RG
- Pode 5RGS camisa ponto de partida com RS *
- repetir de * a * 7 vezes
- Mude a cor eo 4rgs jersey de malha começam com RS lugar e parar estes 17m na 4 ª fila.
Vamos, portanto, nesta segunda parte mais perto, cor camisa 7 classificações e 1 º lugar 8 classificações camisa para a outra cor.
 Montagem:
- Postar agulhada (2 vertentes de fios para tricô para torná-lo mais resistente) a cada aresta ao longo da estreita costela parte
- Esta discussão será desenhado para recolher a parte superior e inferior do pé do sapato
- Dobre a primeira parte (o mais largo) 2, trazendo a primeira linha no 66, lugar, contra o lugar,
- Dobre a costela curto final 2, trazendo o resultado final na primeira
 - Costurar os lados, 1 ª linha para a última linha de uma costura costura e feche a mesma forma que a grande praça para formar a sola do sapato
 Acabamentos:
Nós podemos escolher três pequenas flores cada chinelos:
- (. cadeia de gancho, por exemplo) 2 montamos as extremidades de um cabo
- 3 ª e vamos costurar em cima do forro
Fontes:
Fios e agulhas n º 2 2.5
Fios e agulhas n º 2 2.5
Produção:
- Instale 30m (AIG Não. 2.5)
- Trabalhar 66rgs liga
- Na linha 66, 13m parar mais cedo e terminar rg rg
- * Alterar a cor e continuar em meia estes 17m em 4rgs começando com RS lugar
- tomar 1 ª lugar a cor e fazem 1RG
- Pode 5RGS camisa ponto de partida com RS *
- repetir de * a * 7 vezes
- Mude a cor eo 4rgs jersey de malha começam com RS lugar e parar estes 17m na 4 ª fila.
Vamos, portanto, nesta segunda parte mais perto, cor camisa 7 classificações e 1 º lugar 8 classificações camisa para a outra cor.
Montagem:
- Postar agulhada (2 vertentes de fios para tricô para torná-lo mais resistente) a cada aresta ao longo da estreita costela parte
- Postar agulhada (2 vertentes de fios para tricô para torná-lo mais resistente) a cada aresta ao longo da estreita costela parte
- Esta discussão será desenhado para recolher a parte superior e inferior do pé do sapato
- Dobre a primeira parte (o mais largo) 2, trazendo a primeira linha no 66, lugar, contra o lugar,
- Dobre a costela curto final 2, trazendo o resultado final na primeira
- Costurar os lados, 1 ª linha para a última linha de uma costura costura e feche a mesma forma que a grande praça para formar a sola do sapato
Acabamentos:
Nós podemos escolher três pequenas flores cada chinelos:
- (. cadeia de gancho, por exemplo) 2 montamos as extremidades de um cabo
- 3 ª e vamos costurar em cima do forro
Nós podemos escolher três pequenas flores cada chinelos:
- (. cadeia de gancho, por exemplo) 2 montamos as extremidades de um cabo
- 3 ª e vamos costurar em cima do forro
Sapatinhos de bebê holandeses uma cor
Suprimentos:
Fios e agulhas 2 # 3
 Fabricação:
- Instale 27m (agulha n º 3)
Fabricação:
- Instale 27m (agulha n º 3)
- Trabalhar 60rgs liga
- Na linha 60, pare de 12m começar e terminar rg rg
- * Continuar a camisa 15m em 4rgs começando lugar com RS
- Então 4rgs Camisa começando com RS WS *
- repetir de * a * 8 vezes
- 4rgs malha jersey começando com RS lugar e parar a 15m na 4 ª fila.
Vamos, portanto, nesta segunda parte do ponto mais estreito de 10 classificações meia e meia reverter 9 classificações.
Montagem:
- Postar agulhada (2 vertentes de fios para tricô para torná-lo mais resistente) em cada lado da parte mais estreita
- Puxe a linha para recolher a parte superior e inferior do pé do sapato
- Dobre a primeira parte (o de largura) 2, trazendo a primeira linha no 60 º, lugar, contra o lugar
- Costure o lado, onde continuamos na parte mais estreita, perto da sola do sapato
Acabamentos:
Em seguida, ligue para cada três pequenas chinelos flores:
- (. catenária gancho, por exemplo) 2 montamos as extremidades de um cabo
- ea terceira é que o sew em cima do forro


 (19 ratings)
Suprimentos:
Fios e agulhas 2 # 3
Fabricação:
- Instale 27m (agulha n º 3)
- Trabalhar 60rgs liga
- Na linha 60, pare de 12m começar e terminar rg rg
- * Continuar a camisa 15m em 4rgs começando lugar com RS
- Então 4rgs Camisa começando com RS WS *
- repetir de * a * 8 vezes
- 4rgs malha jersey começando com RS lugar e parar a 15m na 4 ª fila.
- Trabalhar 60rgs liga
- Na linha 60, pare de 12m começar e terminar rg rg
- * Continuar a camisa 15m em 4rgs começando lugar com RS
- Então 4rgs Camisa começando com RS WS *
- repetir de * a * 8 vezes
- 4rgs malha jersey começando com RS lugar e parar a 15m na 4 ª fila.
Vamos, portanto, nesta segunda parte do ponto mais estreito de 10 classificações meia e meia reverter 9 classificações.
Montagem:
- Postar agulhada (2 vertentes de fios para tricô para torná-lo mais resistente) em cada lado da parte mais estreita
- Puxe a linha para recolher a parte superior e inferior do pé do sapato
- Dobre a primeira parte (o de largura) 2, trazendo a primeira linha no 60 º, lugar, contra o lugar
- Costure o lado, onde continuamos na parte mais estreita, perto da sola do sapato
- Puxe a linha para recolher a parte superior e inferior do pé do sapato
- Dobre a primeira parte (o de largura) 2, trazendo a primeira linha no 60 º, lugar, contra o lugar
- Costure o lado, onde continuamos na parte mais estreita, perto da sola do sapato
Acabamentos:
Em seguida, ligue para cada três pequenas chinelos flores:
- (. catenária gancho, por exemplo) 2 montamos as extremidades de um cabo
- ea terceira é que o sew em cima do forro
- (. catenária gancho, por exemplo) 2 montamos as extremidades de um cabo
- ea terceira é que o sew em cima do forro
(19 ratings)
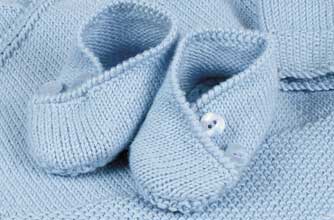
Here's how to knit the matching shoes.
Soles (make 2)
Using 2 strands of yarn tog and 3¼mm needles, cast on 5 sts for back edge.
Mst row: K1, [p1, k1] to end. Working extra sts into mst as they occur, inc 1 st at each of next row and following alternate row - 9 sts. Mst 3 rows. Inc 1 st at each end of next row and following 11th row - 13 sts. Mst 15 (23) rows. Dec 1 st at each end of next row. Mst 1 row. Dec 1 st at each end of next 3 rows - 5 sts. Cast off.
Uppers (make 2)
Using a single strand of yarn and 2¾mm needles, cast on 64 (71) sts.
Beginning with a k row, ss 8 rows. Dec 1 st at each end of next 2 rows and 2 following alternate rows, then on following row - 54 (61) sts. Work 1 row. Mark 6th (7th) st from each end on last row. Cast off.
Top edging: With right side facing, a single strand of yarn and 2.00 hook, rejoin yarn to cast-on edge of upper and work 1 row of dc along cast-on edge. Do not turn. Work 1 row of backwards dc (dc worked from left to right). Fasten off.
To make up
Press as given on ball band. Overlap ends of uppers, having shaped ends together and 8 straight row-ends either side across to markers and oversew these edges together. Sew soles to uppers. With crochet hook, make 2 button loops along top layer of each shoe. Sew on buttons.
Click here for a printable version of the pattern
Did you enjoy this knitting pattern? How easy/hard was it? Would you like more? Please leave us your thoughts in the comments below!
Read more at http://www.goodtoknow.co.uk/family/395122/How-to-knit-the-shoes#UtPMXiGXVdYmAyw4.99


Soles (make 2)
Using 2 strands of yarn tog and 3¼mm needles, cast on 5 sts for back edge.
Mst row: K1, [p1, k1] to end. Working extra sts into mst as they occur, inc 1 st at each of next row and following alternate row - 9 sts. Mst 3 rows. Inc 1 st at each end of next row and following 11th row - 13 sts. Mst 15 (23) rows. Dec 1 st at each end of next row. Mst 1 row. Dec 1 st at each end of next 3 rows - 5 sts. Cast off.
Uppers (make 2)
Using a single strand of yarn and 2¾mm needles, cast on 64 (71) sts.
Beginning with a k row, ss 8 rows. Dec 1 st at each end of next 2 rows and 2 following alternate rows, then on following row - 54 (61) sts. Work 1 row. Mark 6th (7th) st from each end on last row. Cast off.
Top edging: With right side facing, a single strand of yarn and 2.00 hook, rejoin yarn to cast-on edge of upper and work 1 row of dc along cast-on edge. Do not turn. Work 1 row of backwards dc (dc worked from left to right). Fasten off.
To make up
Press as given on ball band. Overlap ends of uppers, having shaped ends together and 8 straight row-ends either side across to markers and oversew these edges together. Sew soles to uppers. With crochet hook, make 2 button loops along top layer of each shoe. Sew on buttons.
Click here for a printable version of the pattern
Did you enjoy this knitting pattern? How easy/hard was it? Would you like more? Please leave us your thoughts in the comments below!
Read more at http://www.goodtoknow.co.uk/family/395122/How-to-knit-the-shoes#UtPMXiGXVdYmAyw4.99
aby booties

This is my own pattern feel free to make items for sale or personal use please do not copy or repost you may share the link with others
Materials:
size 10 DMC crochet cotton
Crochet hook 1.75 mm
1/4 inch satan ribbon color of choice
Sole:
round 1.ch 22,7dc in 4th ch from hook,dc in each chain to last(17 dcs),8dc in last chain,work the other side of chains make 17 dcs ,join in 3rd chain from begening
round 2. ch 3,dc in the same stitch,2dcs in each next 7 dcs,dc in next 17 dc,2dc i each of remaining 8dc,join
round 3.ch3 dcs in same st and next dc(2dc in next,1dc in next)6 times,1dc in each next 18 dcs(dc in next dc,2dc in next)7 times,dc in next 10 st mark last st.made,dc in remaining stitches,join and fasten off.
instep:
1. ch 15,make shell(2d,2ch,2dc) in 7th stitch from hook, skip 3 st shell in next stitch, dc in last st.ch 3, turn
2.shell in each shell,dc in last dc,ch3 turn
3&4. repeat row 2
finish off
side:
attach thread in first row of instep,ch39 DO NOT TWISTchain .attach with sl st to the other side of row 1
round 1. ch3,3dc in each of first 3 rows of in step,5dc in last row,dc in each dc and 2dc in each ch space of last row,working the other side 5dcs in side of last row,3dcs in each of next 3 rows, dc in each ch,join with sl st in ch 3 of first 3 chains.
round 2&3. ch3,dc in each dc join with sl st in 3rd chain of first 3 chains
DO NOT FINISH OFF
hold the sole to the work matching the stitch on the hool to the marked stitch on sole and working trough both layers sc in each stitch around, join and fasten off
For Ruffles:
round1:eyelet round.join with sl st to a corner of the instep, ch4 skip next st,dc in next,(ch1,skip 1 st dc in next)join in 3rd ch of begining 4 chs
round 2: ch3,dc,ch2,2dc all in same stitch,shell(2dc,ch2,2dc) in each dc around, join with sl st in 3rd ch of first ch 3
round 3: sl st to first ch2 space,ch3,dc,ch2,2dc in same space,shell in each shell around fasten off.
weave ribbon throught eyelets and tie into a bow
Stay-On Baby Booties

 baby_projects
- August 4th, 2011

This is just a good recipe containing a photo tutorial. These booties will not fall away from your baby’s feet. Each is knitted bottom up as one piece without yarn cut.
Two types of matching bumpers are available. Rib 2x2 or garter stitch bumber.
If supplied with a ribbon or an I-cord tie the booties will perfectly fit baby foot and will stay on in any case.
Enjoy!
With a large hook and contrasting color yarn chain 40 st loosely for provisional CO. From the chain pick up 38 st. onto your knitting needle, leaving 15 inches tail.
The first and the last st will be edging ones (slip the 1st and purl the last st in every row)
Knit 2 rows back and forth in garter stitch.
Start increasing like this:
3rd row: sl1, k1, m1, k16, m1, k2, m1, k16, m1, k1, p1
4th row and all even rows knit
5th row: sl1, k2, m1, k16, m1, k4, m1, k16, m1, k2, p1
7th row: sl1, k3, m1, k16, m1, k6, m1, k16, m1, k3, p1
9th row: sl1, k4, m1, k16, m1, k8, m1, k16, m1, k4, p1
To prevent any eyelets don’t use yo-increase. Make new st with “invisible M1”: twist the bridge of yarn between the two stitches of the previous row, put it onto your left hand needle as a st and knit through.
When 4 increasing rows are done you will have 54 st. Continue 10 more rows in garter stitch. Then prepare to work out the toe upside (Pic.1).
Next (RS) row sl1, k15 and repeat *k2, p2* 5 times, k1, p1 and turn your work to the WS.
Work 8 rows in 2x2 rib on the 22 st (slip the 1st and purl the last st in every row).
Next (WS) row sl1, p2tog 10 times (joining each time one k st with one p st, see Pic.2), p1.
Turn your work to the RS. You will have now 12 st looking all knitwise (like on Pic.3). Pull the 1st st through the rest of them (Pic.4), leave on your right needle and pull tightly. Tighten as much as possible, just as strong as you can!
Pick up 6 edging st from the left side of the toe onto your left hand needle (Pic.5). Knit these 6, twisting each st to avoid eyelets (Pic.6), k15, p1 (the last st in this row). Turn your work to the WS.
Knit up to the center, then pick 6 edging st (Pic.7) onto your left hand needle, k6, twisting each st, k15, p1.
You can finish the boot tops with any chart you prefer.
Option A.
Simple 2x2 rib is good looking with such toes, and especially if you work out a long cuff to fold it out. To thread a ribbon work the eyelets first (Knit 1 row, purl 1 row, and next (RS) row repeat (K2, K2tog, YO) to the end of row. Purl 1 row. Knit next (RS) row, purl next (WS) row).
Then work about 45 rows in rib. BO loosely or stretchy. Don't cut yarn. Use it to sew the back seam afterwards.
Option B.
Knit 1 row. Purl 1 row. Next (RS) row repeat *k2, k2tog, yo* to the end of row. Purl the next row. And continue 2 rows in stockinette st.
Work 26 rows in garter st and BO but don’t cut the end of yarn. Use it for sewing the seam afterwards.
FINISHING
First rip off the provisional CO chain and graft the foot ‘seam’ with a kitchener stitch using the yarn tail that you left at the beginning (Pic.8).
After that sew the back seam together. If you use a crochet hook, just don’t cut yarn, if you prefer to sew your projects with a needle leave at least 15’’.
Pull the ribbon or an I-cord through the eyelets and tie a bow.
Abbs:
CO – cast on
st – stitch(es)
sl – slip
k – knit
p – purl
p2tog – purl two stitches together
k2tog – knit two stitches together
m – make
yo – yarn over
RS – right side
WS – wrong side
BO – bind off
Pic. 1

Pic. 2

Pic. 3

Pic. 4

Pic. 5

Pic. 6

Pic. 7

Pic. 8


This is my own pattern feel free to make items for sale or personal use please do not copy or repost you may share the link with others
Materials:
size 10 DMC crochet cotton
Crochet hook 1.75 mm
1/4 inch satan ribbon color of choice
Sole:
round 1.ch 22,7dc in 4th ch from hook,dc in each chain to last(17 dcs),8dc in last chain,work the other side of chains make 17 dcs ,join in 3rd chain from begening
round 2. ch 3,dc in the same stitch,2dcs in each next 7 dcs,dc in next 17 dc,2dc i each of remaining 8dc,join
round 3.ch3 dcs in same st and next dc(2dc in next,1dc in next)6 times,1dc in each next 18 dcs(dc in next dc,2dc in next)7 times,dc in next 10 st mark last st.made,dc in remaining stitches,join and fasten off.
instep:
1. ch 15,make shell(2d,2ch,2dc) in 7th stitch from hook, skip 3 st shell in next stitch, dc in last st.ch 3, turn
2.shell in each shell,dc in last dc,ch3 turn
3&4. repeat row 2
finish off
side:
attach thread in first row of instep,ch39 DO NOT TWISTchain .attach with sl st to the other side of row 1
round 1. ch3,3dc in each of first 3 rows of in step,5dc in last row,dc in each dc and 2dc in each ch space of last row,working the other side 5dcs in side of last row,3dcs in each of next 3 rows, dc in each ch,join with sl st in ch 3 of first 3 chains.
round 2&3. ch3,dc in each dc join with sl st in 3rd chain of first 3 chains
DO NOT FINISH OFF
hold the sole to the work matching the stitch on the hool to the marked stitch on sole and working trough both layers sc in each stitch around, join and fasten off
For Ruffles:
round1:eyelet round.join with sl st to a corner of the instep, ch4 skip next st,dc in next,(ch1,skip 1 st dc in next)join in 3rd ch of begining 4 chs
round 2: ch3,dc,ch2,2dc all in same stitch,shell(2dc,ch2,2dc) in each dc around, join with sl st in 3rd ch of first ch 3
round 3: sl st to first ch2 space,ch3,dc,ch2,2dc in same space,shell in each shell around fasten off.
weave ribbon throught eyelets and tie into a bow
- baby_projects
- August 4th, 2011
This is just a good recipe containing a photo tutorial. These booties will not fall away from your baby’s feet. Each is knitted bottom up as one piece without yarn cut.
Two types of matching bumpers are available. Rib 2x2 or garter stitch bumber.
If supplied with a ribbon or an I-cord tie the booties will perfectly fit baby foot and will stay on in any case.
Enjoy!
With a large hook and contrasting color yarn chain 40 st loosely for provisional CO. From the chain pick up 38 st. onto your knitting needle, leaving 15 inches tail.
The first and the last st will be edging ones (slip the 1st and purl the last st in every row)
Knit 2 rows back and forth in garter stitch.
Start increasing like this:
3rd row: sl1, k1, m1, k16, m1, k2, m1, k16, m1, k1, p1
4th row and all even rows knit
5th row: sl1, k2, m1, k16, m1, k4, m1, k16, m1, k2, p1
7th row: sl1, k3, m1, k16, m1, k6, m1, k16, m1, k3, p1
9th row: sl1, k4, m1, k16, m1, k8, m1, k16, m1, k4, p1
To prevent any eyelets don’t use yo-increase. Make new st with “invisible M1”: twist the bridge of yarn between the two stitches of the previous row, put it onto your left hand needle as a st and knit through.
When 4 increasing rows are done you will have 54 st. Continue 10 more rows in garter stitch. Then prepare to work out the toe upside (Pic.1).
Next (RS) row sl1, k15 and repeat *k2, p2* 5 times, k1, p1 and turn your work to the WS.
Work 8 rows in 2x2 rib on the 22 st (slip the 1st and purl the last st in every row).
Next (WS) row sl1, p2tog 10 times (joining each time one k st with one p st, see Pic.2), p1.
Turn your work to the RS. You will have now 12 st looking all knitwise (like on Pic.3). Pull the 1st st through the rest of them (Pic.4), leave on your right needle and pull tightly. Tighten as much as possible, just as strong as you can!
Pick up 6 edging st from the left side of the toe onto your left hand needle (Pic.5). Knit these 6, twisting each st to avoid eyelets (Pic.6), k15, p1 (the last st in this row). Turn your work to the WS.
Knit up to the center, then pick 6 edging st (Pic.7) onto your left hand needle, k6, twisting each st, k15, p1.
You can finish the boot tops with any chart you prefer.
Option A.
Simple 2x2 rib is good looking with such toes, and especially if you work out a long cuff to fold it out. To thread a ribbon work the eyelets first (Knit 1 row, purl 1 row, and next (RS) row repeat (K2, K2tog, YO) to the end of row. Purl 1 row. Knit next (RS) row, purl next (WS) row).
Then work about 45 rows in rib. BO loosely or stretchy. Don't cut yarn. Use it to sew the back seam afterwards.
Option B.
Knit 1 row. Purl 1 row. Next (RS) row repeat *k2, k2tog, yo* to the end of row. Purl the next row. And continue 2 rows in stockinette st.
Work 26 rows in garter st and BO but don’t cut the end of yarn. Use it for sewing the seam afterwards.
FINISHING
First rip off the provisional CO chain and graft the foot ‘seam’ with a kitchener stitch using the yarn tail that you left at the beginning (Pic.8).
After that sew the back seam together. If you use a crochet hook, just don’t cut yarn, if you prefer to sew your projects with a needle leave at least 15’’.
Pull the ribbon or an I-cord through the eyelets and tie a bow.
Abbs:
CO – cast on
st – stitch(es)
sl – slip
k – knit
p – purl
p2tog – purl two stitches together
k2tog – knit two stitches together
m – make
yo – yarn over
RS – right side
WS – wrong side
BO – bind off
Pic. 1
Pic. 2
Pic. 3
Pic. 4
Pic. 5
Pic. 6
Pic. 7
Pic. 8
Manta de Bebê em Crochê
 Free Baby Crochet Patterns
Baby Booties
Free Baby Crochet Patterns
Baby Booties
USA Format
Abbreviations
WS. Wrong Side
RS. Right Side
ch. Chain
sc. Single Crochet
hdc. Half Double Crochet
rpt. Repeat
sl st. Slip Stitch
DNT. Do Not Turn
Dec. Leaving the last loop of each
stitch on hook, yrh and draw
through all loops.
ch2 counts as first hdc
Crab Stitch. sc worked backwards
Size to fit approx: 0-
Materials
1.75oz of Worsted Weight #3
5.00mm & 4.00mm crochet hook
Small amount of 6mm ribbon
GAUGE -
**************************************************
Commence with Sole -
Next Round -
Next Round -
Next Round -
Next Round -
Instep
With WS facing and counting from where you fastened off, skip 10sc, rejoin yarn with a
sl st too next sc, ch1, 1sc in base of ch1, 1sc in next 19sc. Turn leaving 10sc un-
Next Row -
Next Row -
Next Row -
Top -
Next Row -
Next Row -
Next Row -
Next Row -
With 5.00mm hook and top of bootie towards you, rejoin yarn with a sl st to back seam,
ch1, work one row of crab stitch, (see abbrev above) in loose loops on sole of bootie,
sl st to first sc on beginning of row. Fasten off.
Finishing -
Hope you enjoy this Free baby crochet pattern for baby booties.
All Rights Reserved copyright © 2014 justcrochet.com
PFC108
Please do not re-

Nosso algodão encontrá-lo AQUI


Free Baby Crochet Patterns
Baby Booties
USA Format
Abbreviations
WS. Wrong Side
RS. Right Side
ch. Chain
sc. Single Crochet
hdc. Half Double Crochet
rpt. Repeat
sl st. Slip Stitch
DNT. Do Not Turn
Dec. Leaving the last loop of each
stitch on hook, yrh and draw
through all loops.
ch2 counts as first hdc
Crab Stitch. sc worked backwards
Size to fit approx: 0-
Materials
1.75oz of Worsted Weight #3
5.00mm & 4.00mm crochet hook
Small amount of 6mm ribbon
GAUGE -
**************************************************
Commence with Sole -
in each of next 6ch, 8hdc in last ch, working on opposite side of cast on ch, work 1hdc in each of next 6ch, 4hdc in last ch, sl st to top of the ch3 on beginning of row. DNT.
(27hdc + ch2)
Next Round -
each of next 6hdc, 1hdc in each of next 8hdc, 2hdc in each of last 2hdc, 1hdc in base
of ch2, sl st to top of ch2. DNT. (39hdc + ch2).
Next Round -
top of ch2. DNT. (39hdc + ch2).
Next Round -
hdc to end, sl st to first sc. Turn (40sc)
Next Round -
end, sl st to first sc. Turn (40sc). Rpt last row once. Fasten off.
Instep
With WS facing and counting from where you fastened off, skip 10sc, rejoin yarn with a
sl st too next sc, ch1, 1sc in base of ch1, 1sc in next 19sc. Turn leaving 10sc un-
Next Row -
9 times, 1sc in last sc. Turn. (11sc)
Next Row -
Next Row -
hook to close, work ch1. Turn.
Top -
Next Row -
2sc, * rpt from * to * to end. Turn. (9, ch2 spaces)
Next Row -
Next Row -
Next Row -
end, working down first side of split, work 1sc in each row end to bottom of V, sl st in V,
1sc in each row end up second side of split, sl st to first sc. Fasten off.
With 5.00mm hook and top of bootie towards you, rejoin yarn with a sl st to back seam,
ch1, work one row of crab stitch, (see abbrev above) in loose loops on sole of bootie,
sl st to first sc on beginning of row. Fasten off.
Finishing -
on ankle and tie in a bow, fold down top, decorate with rosebud (optional)
Hope you enjoy this Free baby crochet pattern for baby booties.
All Rights Reserved copyright © 2014 justcrochet.com
PFC108
Please do not re-
If you do make and sell the finished items from any of my FREE patterns
please give credit to patternsforcrochet as the designer and
put a link back to this website.
Thanking you Heather
Nosso algodão encontrá-lo AQUI
Vamos começar com o único:

Único
11 cadeias
A partir do segundo gato. 10 mb
2 pb no último cadeia como fazer outro canto
Por outro lado, temos de colocar mais 10 mb começando com a última corrente.
(Temos um total de 4 pb no último cadeia)
Na segunda cadeia e colocar os outros 2 mb com uma m.bass. em primeiro dc fechar a rodada.
1 gato. , 4 cc, 3 hdc, 1 pb, 4 aumenta, mas, mas 1, 3 mma, aumentos de 3 pb, 1 m.bass. para fechar o passeio.
1 gato. , 7 sc, 2 hdc, um incr. mma, 4 inc. ma, uma incr. mma, mma 2, 8 sc, 2 inc. de sc, 2 pb, 2 inc.MB, 1 m.bass. para fechar o passeio.
Para aqueles que querem um em profundidade é o vídeo que explica cada passo.
|
| Único |
11 cadeias
A partir do segundo gato. 10 mb
2 pb no último cadeia como fazer outro canto
Por outro lado, temos de colocar mais 10 mb começando com a última corrente.
(Temos um total de 4 pb no último cadeia)
Na segunda cadeia e colocar os outros 2 mb com uma m.bass. em primeiro dc fechar a rodada.
1 gato. , 4 cc, 3 hdc, 1 pb, 4 aumenta, mas, mas 1, 3 mma, aumentos de 3 pb, 1 m.bass. para fechar o passeio.
1 gato. , 7 sc, 2 hdc, um incr. mma, 4 inc. ma, uma incr. mma, mma 2, 8 sc, 2 inc. de sc, 2 pb, 2 inc.MB, 1 m.bass. para fechar o passeio.
Para aqueles que querem um em profundidade é o vídeo que explica cada passo.
Tamanho da Sapata:

Scarpetta dx
1 ch. Trazemos a linha na frente e de trás, criamos m.bass.precisamente 41, em seguida, uma m.bass. para fechar o passeio.
1 gato. 41 pb, 1 m.bass. para fechar a turnê
1 gato. , 6 pb, 1 pb dezembro em relevo, 1 mpa, 1 HTR não está totalmente fechada, uma HTR em relevo a partir do link acima, juntamente com o mma próximo anterior. , * 1 pa, 1, mas não fechado, 1 mas eu notar a partir do link acima, mas perto do InSim pré. * Descanse em paz. *. * mais 2 vezes, 1 não HTR totalmente fechada, uma HTR em relevo a partir do link acima, juntamente com o mma próximo anterior. , 1 pb, 1 pb dezembro em relevo. , 14 MB, 1 m.bass. para fechar o passeio.
1 gato. , 6 pb, 1 pb dezembro em relevo. , 1 não HTR fechada, 1 HTR na tomada de alívio no prev mesh. Feche juntamente com o mma anterior, * 1, mas não fechado, mas em relevo a partir do link antes, mas fechou com o anterior. * Descanse em paz. *. * mais 2 vezes, 1 não HTR fechada, 1 HTR na tomada de alívio no prev mesh. Feche juntamente com o mma anterior, 1 pb dezembroem relevo, 14 cc, 1 m.bass. para empurrar o no colo.
1 ch. Trazemos a linha na frente e de trás, criamos m.bass.precisamente 41, em seguida, uma m.bass. para fechar o passeio.
|
| Scarpetta dx |
1 gato. 41 pb, 1 m.bass. para fechar a turnê
1 gato. , 6 pb, 1 pb dezembro em relevo, 1 mpa, 1 HTR não está totalmente fechada, uma HTR em relevo a partir do link acima, juntamente com o mma próximo anterior. , * 1 pa, 1, mas não fechado, 1 mas eu notar a partir do link acima, mas perto do InSim pré. * Descanse em paz. *. * mais 2 vezes, 1 não HTR totalmente fechada, uma HTR em relevo a partir do link acima, juntamente com o mma próximo anterior. , 1 pb, 1 pb dezembro em relevo. , 14 MB, 1 m.bass. para fechar o passeio.
1 gato. , 6 pb, 1 pb dezembro em relevo. , 1 não HTR fechada, 1 HTR na tomada de alívio no prev mesh. Feche juntamente com o mma anterior, * 1, mas não fechado, mas em relevo a partir do link antes, mas fechou com o anterior. * Descanse em paz. *. * mais 2 vezes, 1 não HTR fechada, 1 HTR na tomada de alívio no prev mesh. Feche juntamente com o mma anterior, 1 pb dezembroem relevo, 14 cc, 1 m.bass. para empurrar o no colo.
A última rodada você tem que escolher se deseja criar um sapato para a esquerda ou direita
Acabamento:
Bunny Slippers

NOTE: My patterns are free and I would like them to stay that way. You are free to print them out and pass them around but please make sure my blog address is somewhere on the pattern (www.knotyournanascrochet.com) so that people know where the pattern originated.
Please do not sell my patterns or say they are your own. You are free to do whatever you want with the finished item. If you are selling them online please link back the pattern and give me credit. I took the time to write this pattern out so the least you can do is take the small amount of time it takes to give me credit.
Materials
3.50 mm hook
DK Yarn - I used Olympus by Crucci
Scissors
Yarn needle
Tape Measure
0-3 months- fits 3.5'' foot
Pattern
DO NOT JOIN, MARK EACH ROUND WITH A STITCH MARKER.
Round 1: Ch 9, work 2 sc into the 2nd chain from the hook. Sc in next 4 stitches. Hdc innext stitch, 2 hdc in next. 6 hdc in last ch. Now working along the other side of the chain. 2 hdc in next stitch, hdc in next. Sc in next 4 stitches. 2 sc into the last ch. (24 stitches)
Round 2: 2 sc into the first stitch, 2 sc into next stitch, sc in next 6. 2 sc in next stitch, sc in next, 2 sc in next 4 stitches. Sc in next stitch, 2 sc in next. sc in next 6. 2 sc into each of the last 2 stitches.. (34 sts)
Round 3: sc in next 2 stitches, 2 sc into the next stitch. sc in next 11 stitches. Put 2 sc into the next 2 stitches. sc in the next 2 stitches. Put 2 sc into the next 2 stitches. sc in the next 11 stitches. 2 sc into the next stitch. Sc in next 2 stitches. (40)
Sides:
Round 4: Join to first sc with a sl st, working in back loop only. Ch 1, sc in each stitch around. (41)
Round 5: Ch 1, sc in same stitch as ch 1 and around. Join with a slip stitch. Ch 1(41)
Round 6: sc around, join with a slip stitch, ch 1, (41)
Round 7: sc around, join with a slip stitch, ch 1 (41)
Round 8: Sc in same stitch as ch 1, sc2tog, sc in next 8. Hdc in next stitch, hdc2tog 9 times. Hdc in next stitch, sc in next 7. Sc2tog, sc 1. Join to top of first sc with a slip stitch. Ch 1. (30)
Round 9: Sc in next 9, sc2tog 6 times, sc in next 9, Join first sc with a slip stitch (24)
Round 10: Sc in next 9, sc2tog 3 times, sc in next 9. Join to first sc with a slip stitch (21)
Ears - Make 4
Round 1: Ch 4, sc in 2nd chain from the hook, sc in next stitch. 3 sc in last stitch. Working along back of ch. Sc in next 2. 2 sc in last stitch.
Round 2: sc in next 2 stitches, 2 sc in each of the next 3 stitches. Sc in next 4 stitches,
Round 3: sc in next 12. Do not join.
I surface slip stitched a half circle in the middle of the ears but this is not necessary.
Make two 4cm pom poms
Weave in ends, embroider face and sew ears and pom poms on. Add yarn bows and you’re finished.

A perfeição como dois pés macios.

NOTE: My patterns are free and I would like them to stay that way. You are free to print them out and pass them around but please make sure my blog address is somewhere on the pattern (www.knotyournanascrochet.com) so that people know where the pattern originated.
Please do not sell my patterns or say they are your own. You are free to do whatever you want with the finished item. If you are selling them online please link back the pattern and give me credit. I took the time to write this pattern out so the least you can do is take the small amount of time it takes to give me credit.
Materials
3.50 mm hook
DK Yarn - I usedOlympus by Crucci
Scissors
Yarn needle
Tape Measure
3.50 mm hook
DK Yarn - I used
Scissors
Yarn needle
Tape Measure
0-3 months- fits 3.5'' foot
Pattern
Pattern
DO NOT JOIN, MARK EACH ROUND WITH A STITCH MARKER.
Round 1: Ch 9, work 2 sc into the 2nd chain from the hook. Sc in next 4 stitches. Hdc innext stitch, 2 hdc in next. 6 hdc in last ch. Now working along the other side of the chain. 2 hdc in next stitch, hdc in next. Sc in next 4 stitches. 2 sc into the last ch. (24 stitches)
Round 2: 2 sc into the first stitch, 2 sc into next stitch, sc in next 6. 2 sc in next stitch, sc in next, 2 sc in next 4 stitches. Sc in next stitch, 2 sc in next. sc in next 6. 2 sc into each of the last 2 stitches.. (34 sts)
Round 3: sc in next 2 stitches, 2 sc into the next stitch. sc in next 11 stitches. Put 2 sc into the next 2 stitches. sc in the next 2 stitches. Put 2 sc into the next 2 stitches. sc in the next 11 stitches. 2 sc into the next stitch. Sc in next 2 stitches. (40)
Sides:
Round 4: Join to first sc with a sl st, working in back loop only. Ch 1, sc in each stitch around. (41)
Round 5: Ch 1, sc in same stitch as ch 1 and around. Join with a slip stitch. Ch 1(41)
Round 6: sc around, join with a slip stitch, ch 1, (41)
Round 7: sc around, join with a slip stitch, ch 1 (41)
Round 8: Sc in same stitch as ch 1, sc2tog, sc in next 8. Hdc in next stitch, hdc2tog 9 times. Hdc in next stitch, sc in next 7. Sc2tog, sc 1. Join to top of first sc with a slip stitch. Ch 1. (30)
Round 9: Sc in next 9, sc2tog 6 times, sc in next 9, Join first sc with a slip stitch (24)
Round 10: Sc in next 9, sc2tog 3 times, sc in next 9. Join to first sc with a slip stitch (21)
Ears - Make 4
Working in the round, mark first stitch with marker.
Round 1: Ch 4, sc in 2nd chain from the hook, sc in next stitch. 3 sc in last stitch. Working along back of ch. Sc in next 2. 2 sc in last stitch.
Round 2: sc in next 2 stitches, 2 sc in each of the next 3 stitches. Sc in next 4 stitches,
Round 3: sc in next 12. Do not join.
I surface slip stitched a half circle in the middle of the ears but this is not necessary.
Make two 4cm pom poms
Weave in ends, embroider face and sew ears and pom poms on. Add yarn bows and you’re finished.
A perfeição como dois pés macios.
Bunny Slippers
NOTE: My patterns are free and I would like them to stay that way. You are free to print them out and pass them around but please make sure my blog address is somewhere on the pattern (www.knotyournanascrochet.com) so that people know where the pattern originated.
Please do not sell my patterns or say they are your own. You are free to do whatever you want with the finished item. If you are selling them online please link back the pattern and give me credit. I took the time to write this pattern out so the least you can do is take the small amount of time it takes to give me credit.
Materials
3.50 mm hook
DK Yarn - I used Olympus by Crucci
Scissors
Yarn needle
Tape Measure
0-3 months- fits 3.5'' foot
Pattern
DO NOT JOIN, MARK EACH ROUND WITH A STITCH MARKER.
Round 1: Ch 9, work 2 sc into the 2nd chain from the hook. Sc in next 4 stitches. Hdc innext stitch, 2 hdc in next. 6 hdc in last ch. Now working along the other side of the chain. 2 hdc in next stitch, hdc in next. Sc in next 4 stitches. 2 sc into the last ch. (24 stitches)
Round 2: 2 sc into the first stitch, 2 sc into next stitch, sc in next 6. 2 sc in next stitch, sc in next, 2 sc in next 4 stitches. Sc in next stitch, 2 sc in next. sc in next 6. 2 sc into each of the last 2 stitches.. (34 sts)
Round 3: sc in next 2 stitches, 2 sc into the next stitch. sc in next 11 stitches. Put 2 sc into the next 2 stitches. sc in the next 2 stitches. Put 2 sc into the next 2 stitches. sc in the next 11 stitches. 2 sc into the next stitch. Sc in next 2 stitches. (40)
Sides:
Round 4: Join to first sc with a sl st, working in back loop only. Ch 1, sc in each stitch around. (41)
Round 5: Ch 1, sc in same stitch as ch 1 and around. Join with a slip stitch. Ch 1(41)
Round 6: sc around, join with a slip stitch, ch 1, (41)
Round 7: sc around, join with a slip stitch, ch 1 (41)
Round 8: Sc in same stitch as ch 1, sc2tog, sc in next 8. Hdc in next stitch, hdc2tog 9 times. Hdc in next stitch, sc in next 7. Sc2tog, sc 1. Join to top of first sc with a slip stitch. Ch 1. (30)
Round 9: Sc in next 9, sc2tog 6 times, sc in next 9, Join first sc with a slip stitch (24)
Round 10: Sc in next 9, sc2tog 3 times, sc in next 9. Join to first sc with a slip stitch (21)
Ears - Make 4
Round 1: Ch 4, sc in 2nd chain from the hook, sc in next stitch. 3 sc in last stitch. Working along back of ch. Sc in next 2. 2 sc in last stitch.
Round 2: sc in next 2 stitches, 2 sc in each of the next 3 stitches. Sc in next 4 stitches,
Round 3: sc in next 12. Do not join.
I surface slip stitched a half circle in the middle of the ears but this is not necessary.
Make two 4cm pom poms
Weave in ends, embroider face and sew ears and pom poms on. Add yarn bows and you’re finished.
NOTE: My patterns are free and I would like them to stay that way. You are free to print them out and pass them around but please make sure my blog address is somewhere on the pattern (www.knotyournanascrochet.com) so that people know where the pattern originated.
Please do not sell my patterns or say they are your own. You are free to do whatever you want with the finished item. If you are selling them online please link back the pattern and give me credit. I took the time to write this pattern out so the least you can do is take the small amount of time it takes to give me credit.
Materials
3.50 mm hook
DK Yarn - I usedOlympus by Crucci
Scissors
Yarn needle
Tape Measure
3.50 mm hook
DK Yarn - I used
Scissors
Yarn needle
Tape Measure
0-3 months- fits 3.5'' foot
Pattern
Pattern
DO NOT JOIN, MARK EACH ROUND WITH A STITCH MARKER.
Round 1: Ch 9, work 2 sc into the 2nd chain from the hook. Sc in next 4 stitches. Hdc innext stitch, 2 hdc in next. 6 hdc in last ch. Now working along the other side of the chain. 2 hdc in next stitch, hdc in next. Sc in next 4 stitches. 2 sc into the last ch. (24 stitches)
Round 2: 2 sc into the first stitch, 2 sc into next stitch, sc in next 6. 2 sc in next stitch, sc in next, 2 sc in next 4 stitches. Sc in next stitch, 2 sc in next. sc in next 6. 2 sc into each of the last 2 stitches.. (34 sts)
Round 3: sc in next 2 stitches, 2 sc into the next stitch. sc in next 11 stitches. Put 2 sc into the next 2 stitches. sc in the next 2 stitches. Put 2 sc into the next 2 stitches. sc in the next 11 stitches. 2 sc into the next stitch. Sc in next 2 stitches. (40)
Sides:
Round 4: Join to first sc with a sl st, working in back loop only. Ch 1, sc in each stitch around. (41)
Round 5: Ch 1, sc in same stitch as ch 1 and around. Join with a slip stitch. Ch 1(41)
Round 6: sc around, join with a slip stitch, ch 1, (41)
Round 7: sc around, join with a slip stitch, ch 1 (41)
Round 8: Sc in same stitch as ch 1, sc2tog, sc in next 8. Hdc in next stitch, hdc2tog 9 times. Hdc in next stitch, sc in next 7. Sc2tog, sc 1. Join to top of first sc with a slip stitch. Ch 1. (30)
Round 9: Sc in next 9, sc2tog 6 times, sc in next 9, Join first sc with a slip stitch (24)
Round 7: sc around, join with a slip stitch, ch 1 (41)
Round 8: Sc in same stitch as ch 1, sc2tog, sc in next 8. Hdc in next stitch, hdc2tog 9 times. Hdc in next stitch, sc in next 7. Sc2tog, sc 1. Join to top of first sc with a slip stitch. Ch 1. (30)
Round 9: Sc in next 9, sc2tog 6 times, sc in next 9, Join first sc with a slip stitch (24)
Round 10: Sc in next 9, sc2tog 3 times, sc in next 9. Join to first sc with a slip stitch (21)
Ears - Make 4
Working in the round, mark first stitch with marker.
Round 1: Ch 4, sc in 2nd chain from the hook, sc in next stitch. 3 sc in last stitch. Working along back of ch. Sc in next 2. 2 sc in last stitch.
Round 2: sc in next 2 stitches, 2 sc in each of the next 3 stitches. Sc in next 4 stitches,
Round 3: sc in next 12. Do not join.
I surface slip stitched a half circle in the middle of the ears but this is not necessary.
Make two 4cm pom poms
Weave in ends, embroider face and sew ears and pom poms on. Add yarn bows and you’re finished.
Nenhum comentário:
Postar um comentário