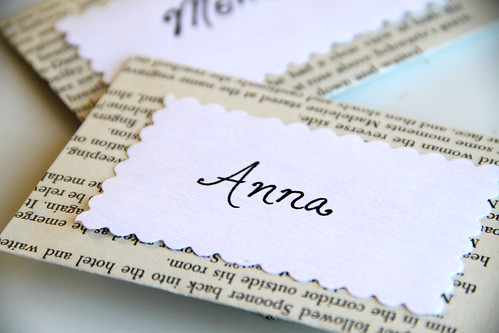
OMO: FAÇA UM RASCUNHO ÁRVORE DE NATAL

Como: Faça um rascunho árvore de Natal
Esta brochura decorativo árvore de Natal é super bonito, fácil de fazer, e acessível. É mesmo uma grande embarcação que fazer com os seus filhos, embora eu recomendo deixar um adulto fazer o corte com o estilete. É assim que nós fazemos isso na minha casa. Quer dizer, não temos filhos, mas meu marido é um pouco desconfiado de me deixar sozinha com objetos afiados. Eu não posso imaginar por que. (UPDATE: Estamos totalmente de ter um filho agora, mas J ainda não mudou sua posição sobre o todo "afiado objeto" coisa)
Existem diversas variações que você pode fazer sobre estas árvores (como a árvore enrolada & a árvore cheia de glitter cameo no fundo) que você pode aprender a fazer AQUI .
Um livro de bolso - você pode usar um que você já possui ou pegar um livro de férias temático de idade em um brechó!
Um estilete
Adesivo seco
Suprimentos opcionais: glitter e cola (eu usei Martha Stewart brilho ouropel em brownstone e ouro, bem como Martha Stewart brilhante cola w / pincel aplicador é mãos a melhor cola para aplicação de glitter.).
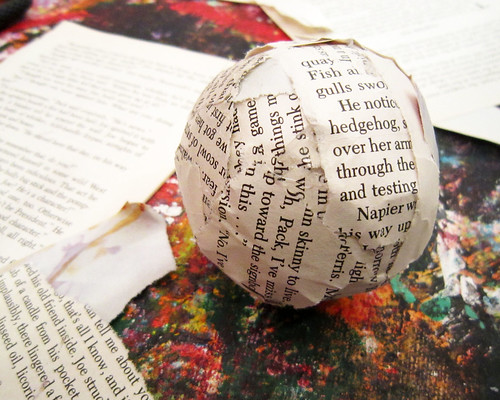
Primeiro Passo: encontrar um livro de bolso. Olhe, eu encontrei alguns. Isso é porque eu herdei 352580551 livros de bolso de meus avós e eles estão se multiplicando ao redor da minha casa.

Paperback Natal Passo Tutorial Árvore 1
Segundo passo: Retire com cuidado a tampa para que ele está nu. Espero que o seu livro não é modesto. Meu fez alguns de volta modelagem nua em escola de arte.

Paperback Natal Passo Tutorial Árvore 2
Terceiro Passo: Conte 30 páginas de seu livro. Este é o lugar onde os números de página vir a calhar.

Paperback Natal Passo Tutorial Árvore 3
Quarto passo: Use um estilete para cortar para baixo da coluna onde você particionado fora de suas páginas 30. Não se preocupe, o livro não vai sentir nada.

Paperback árvore de Natal Tutorial Passo 4
Quinto passo: Repita os passos três e quatro. Você deve ter dois conjuntos de 30 páginas que se parecem com isto:

Paperback Natal Passo Tutorial Árvore 5
Sexto passo: Agora pegue uma seção do livro e deitar em cima da mesa, de modo que a coluna é voltada para a esquerda, como mostrado. Segure o canto superior direito e dobre-o para baixo, de modo que a borda do canto está tocando a coluna vertebral.

Paperback Natal Passo Tutorial árvore 6
Passo Sete: Agora segure a parte da página onde a borda dobrada atende a vara. Dobrá-lo de forma que a parte da página que já dobrado a partir do último passo vai ficar alinhada com a coluna vertebral. É como dobrar um avião de papel.

Paperback Natal Passo Tutorial Árvore 7
Passo Oito: ou dobrar a parte saliente da página para cima ou para cortá-lo. Eu prefiro cortar meu.Ele vai sentar-se bem de qualquer maneira.

Paperback Natal Passo Tutorial Árvore 8
Passo Nove: Continue a fazer isto até que todas as páginas são dobradas.

Paperback Natal Passo Tutorial Árvore 9a

Paperback Natal Passo Tutorial Árvore 9b

Paperback Natal Passo Tutorial Árvore 9c
Passo Dez: Pegue o outro conjunto de 30 páginas e lançá-lo para que a coluna vertebral é na direita. Repita as etapas de seis a oito.

Paperback Natal Passo Tutorial Árvore de 10
Passo Onze (opcional): Agora segure a página do livro com a parte dobrada para você e escovar cola ao longo das bordas. Em seguida, mergulhe as bordas em glitter e sacudir o excesso.

Paperback Natal Passo Tutorial Árvore de 11

Paperback árvore de Natal 11a Etapa Tutorial
Nota: quando você usa o glitter, você vai ter que gentilmente separar as bordas da página depois para que a cola não adere as páginas juntos.
Passo Doze: Coloque as páginas dobradas para baixo e aplicar o adesivo seco liberalmente para a página inicial eo último

Paperback Natal Passo Tutorial Árvore de 12
Passo Treze: Pressione as duas bordas de cada conjunto em conjunto, alinhando as bordas.Abra as páginas e enrolar até que você pode fazer o mesmo ambos os lados.

Paperback Natal Passo Tutorial Árvore de 13
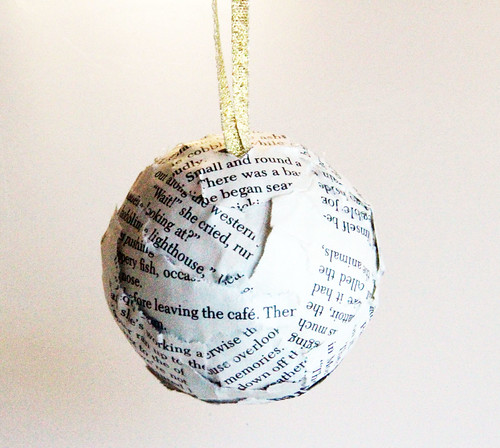
Passo Quatorze: Sente-se e deixe secar! Ocasionalmente, você vai precisar adicionar um pouco de cola para o topo da árvore, ao longo da borda interna para mantê-lo de gapping mas se você usar adesivo bastante seco que não deve ser um problema! Sente-se e desfrutar de todos os elogios que você recebe em sua árvore incrível.

Paperback Tutorial Árvore de Natal
Como este tutorial? Sinta-se livre par
aths...

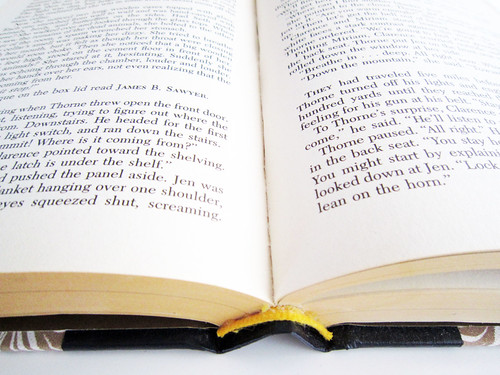
Then find a super old hymn book from your thrift store... I picked mine up for $1... You know when you have a good find when the book was printed in 1952, and smells extremely musty :)
 For my particular book, I would rip out a few pages at a time, and cut them in to strips (the "hot dog" way). I got about 5 per page at about 5 inches each. Then I took 5 strips and glued them together like this:
 I then cut some beading wire about the 15 inches long. At one end I made a loop... this is where you will tie your string or ornament hanger for it to hang off the tree.
 I would then string the wire through the paper, add a pearl, then through the paper, then add a pearl, and so one and so on. I included a picture below (you can't see but there are also pearls on the other side of the paper as it alternates):
 When you're finished, wrap the wire around the loop you made, and it should end up like this...
 She's looking super cute, but I needed to make her cuter :) From Hobby lobby, I grabbed this stuff called Diamond Dust. It's not glitter, and looks a bit more like ice crystals.
 Because Diamond Dust isn't glitter, I mixed it together with super fine glitter "dust" in a tupperware bowl to make it super sparkly...
 Then with a paint brush, I painted on craft glue over the sides of the wreath....
 Then dipped it in to the diamond/glitter mixture...
 Then while the side already down is marinating in glitter, I painted the top.. and you end up with this!
 But she still needs a bow! So I made a simple bow and rhinestoned the middle...
 Then hot glued it on to the wreath, added a gold ribbon for it to hang from, and here is what I got!

 I am absolutely in love with it... and so is Mr. Husband :) Now, hopefully I have the patience to make 10 - 15 more!!


 So simple - you can poke metal ornament hangers right through the rolled book pages. Make the holes deep in between the pages and you'll never see the hole when you remove the ornaments later.
My book wreath was already hanging in front of some green fabric (glued to the wall), so the red ornaments made it perfectly Christmas-y.


Then find a super old hymn book from your thrift store... I picked mine up for $1... You know when you have a good find when the book was printed in 1952, and smells extremely musty :)
 For my particular book, I would rip out a few pages at a time, and cut them in to strips (the "hot dog" way). I got about 5 per page at about 5 inches each. Then I took 5 strips and glued them together like this:
 I then cut some beading wire about the 15 inches long. At one end I made a loop... this is where you will tie your string or ornament hanger for it to hang off the tree.
 I would then string the wire through the paper, add a pearl, then through the paper, then add a pearl, and so one and so on. I included a picture below (you can't see but there are also pearls on the other side of the paper as it alternates):
 When you're finished, wrap the wire around the loop you made, and it should end up like this...
 She's looking super cute, but I needed to make her cuter :) From Hobby lobby, I grabbed this stuff called Diamond Dust. It's not glitter, and looks a bit more like ice crystals.
 Because Diamond Dust isn't glitter, I mixed it together with super fine glitter "dust" in a tupperware bowl to make it super sparkly...
 Then with a paint brush, I painted on craft glue over the sides of the wreath....
 Then dipped it in to the diamond/glitter mixture...
 Then while the side already down is marinating in glitter, I painted the top.. and you end up with this!
 But she still needs a bow! So I made a simple bow and rhinestoned the middle...
 Then hot glued it on to the wreath, added a gold ribbon for it to hang from, and here is what I got!
 I am absolutely in love with it... and so is Mr. Husband :) Now, hopefully I have the patience to make 10 - 15 more!!
holiday crafting with book pages
This holiday season I am noticing a trend- book pages! They are everywhere from Anthropologie to West Elm, it is obvious that everyone has discovered the versatility and beauty of text on a book page. I have been using recycled book pages for quite a while and can attest to the fact that they are a simple, affordable and a beautiful supply to use in art and craft projects.
I decided to put together some SUPER easy ideas to get started using book pages in your holiday crafting.
I like to encourage recycling- so look for old books that you don't want to keep.
Use pages with just text- no pictures.
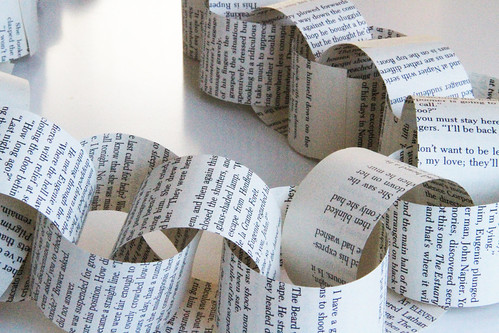
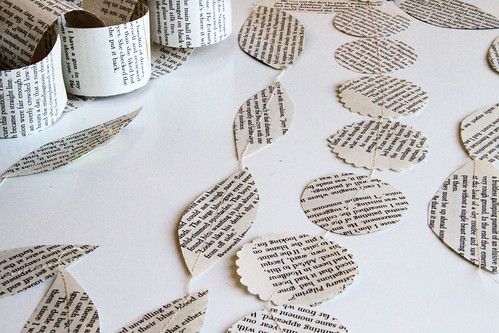
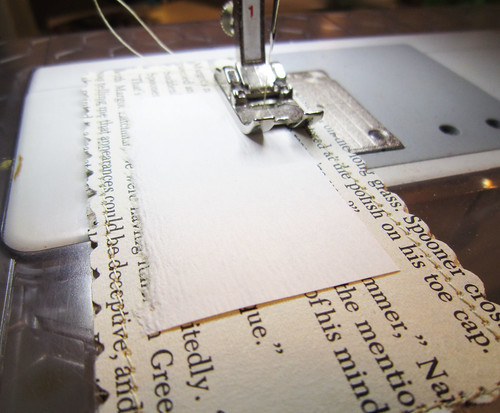
Create a chain garland from strips of book pages.
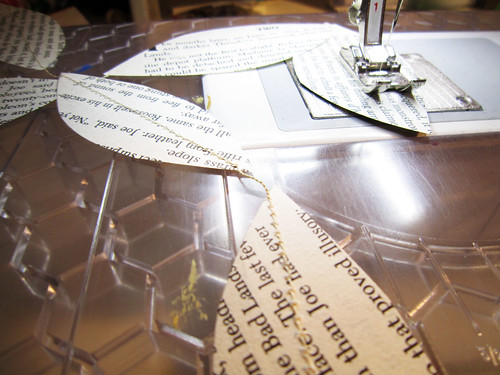
Or cut out simple shapes and feed them through the sewing machine with a straight stitch to create a garland.
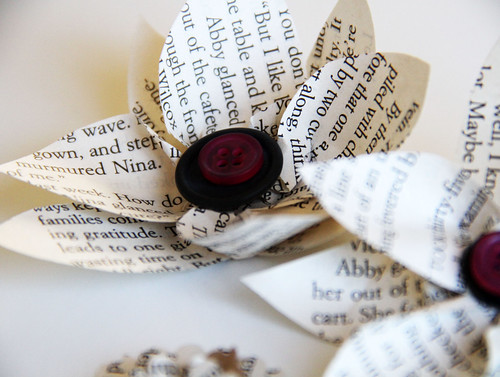
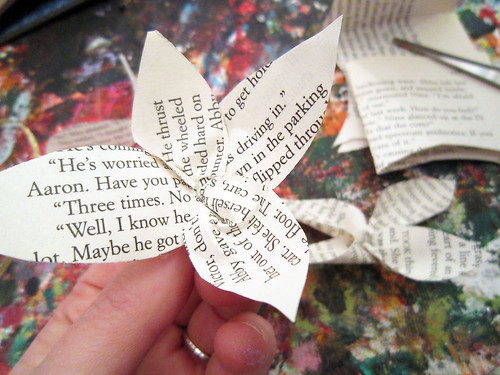
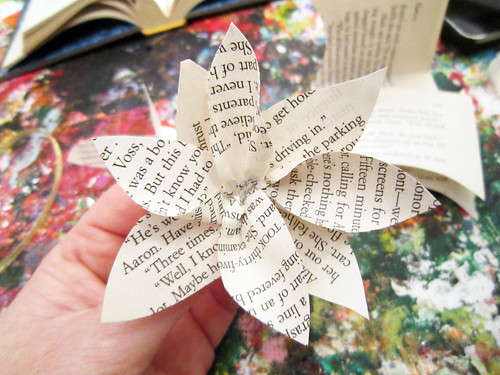
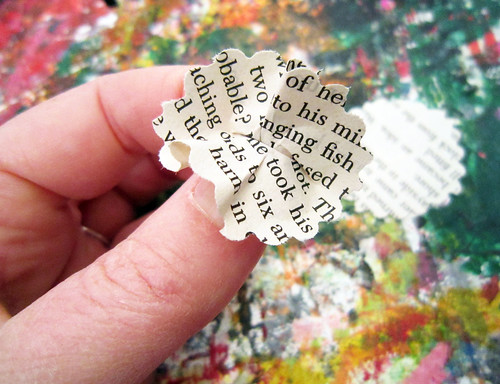
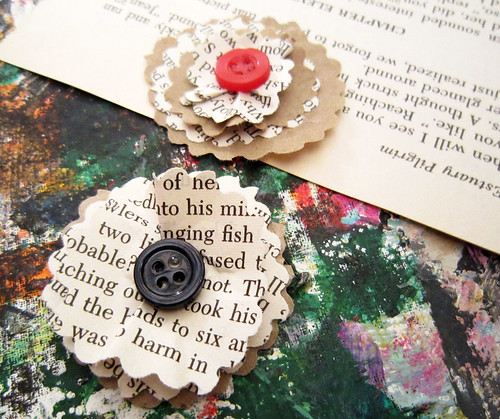
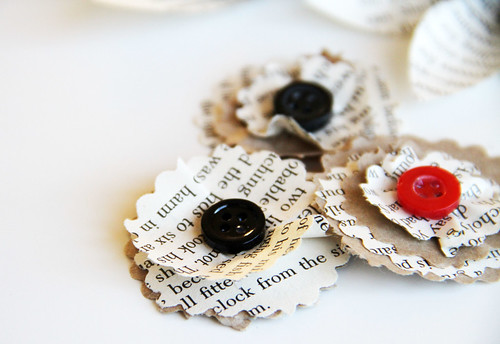
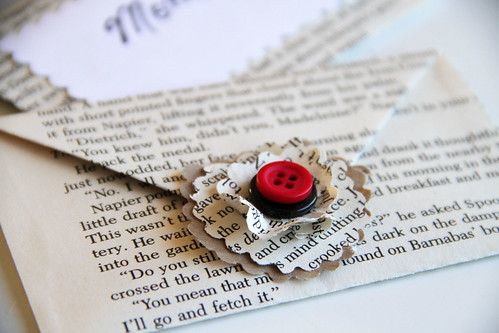
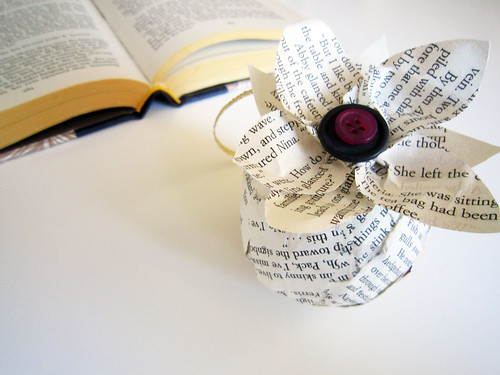
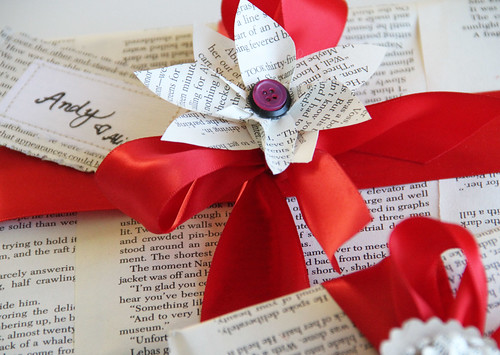
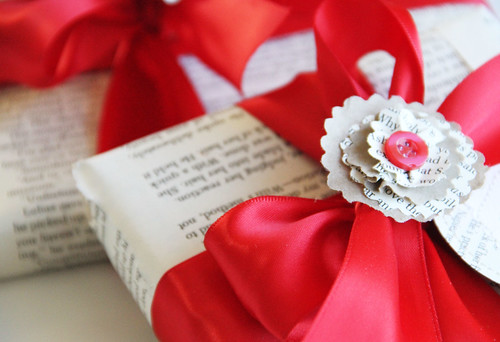
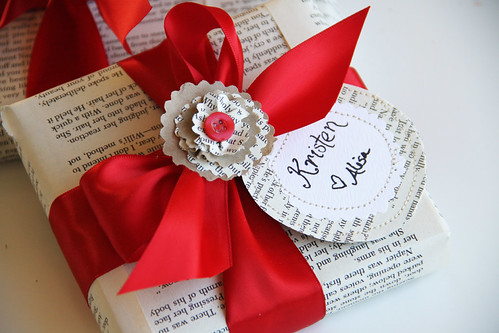
Create simple flowers by cutting out shapes.
Use hot glue and scrunch then together for dimension.
Layer until you have a full flower.
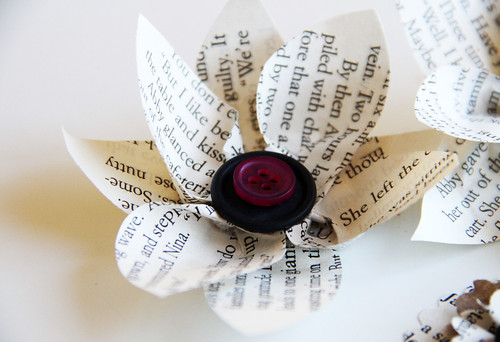
Glue down a button to the middle.
Again, cut out a simple shape (use decorative scissors for the edges).
Scrunch for dimension.
And layer together.
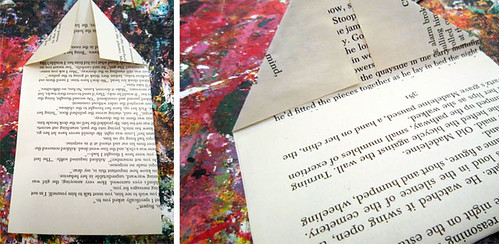
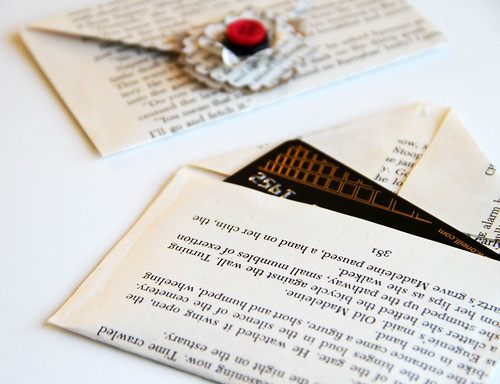
Create a simple envelope to wrap gift cards.
Layer a pretty piece of paper for the label.
Add a pretty flower to the back!
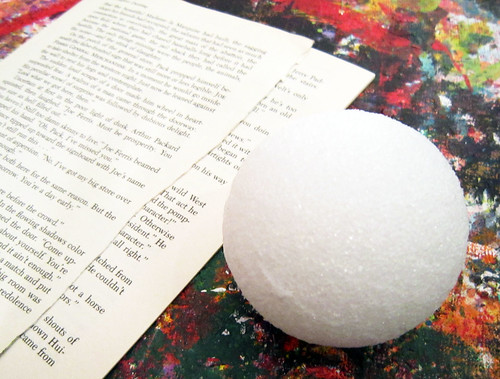
Use styrofoam, glass or cardboard shapes and forms
And cover with scraps of book pages.
Keep it simple
or embellish!
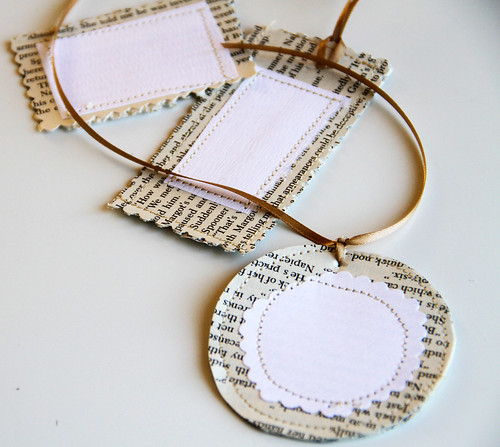
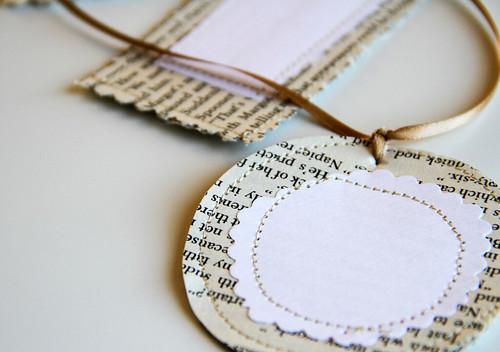
Create simple gist tags by layering a few pages for stability.
Sew them together and layer a black piece of paper to the top.
Create different shapes and sizes.
Add a ribbon to the top.
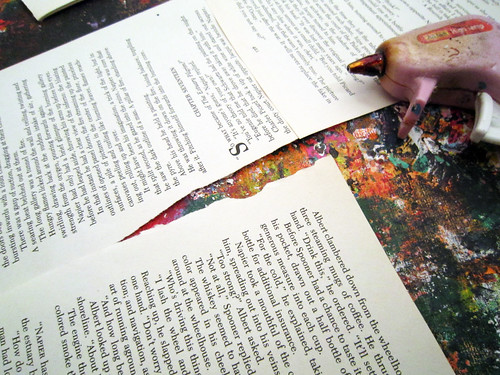
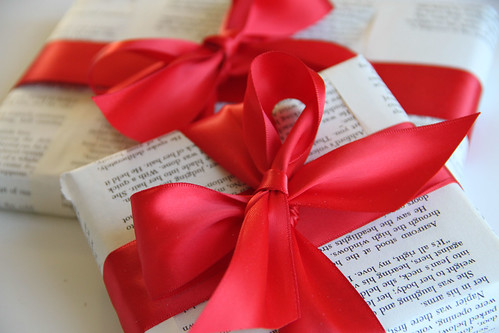
Create wrapping paper!
Since book pages are not typically large, use hot glue and glue pages together to create a sheet of wrapping paper.
Wrap
and top with a pretty bow.
Add the gift tag
and flowers to the top the gift!
You might also like:

My book wreath was already hanging in front of some green fabric (glued to the wall), so the red ornaments made it perfectly Christmas-y.

, 2009
Recycled Wreath Tutorial

My love and passion for toilet paper rolls is soaring to new heights this week! I have been filming and creating non stop for my Haute Holidays online class the last couple of days and this means I am in full holiday mode and trying to find new ideas and projects to share! And this also means finding new and different ways to put toilet paper rolls to use! (I promise my next tutorial will not involve anything related to toilet paper!)
Today, I had the bright idea to make a non traditional wreath from cut up cardboard rolls.

Start by cutting the cardboard rolls into sections- varying in width.

Line up the sections into a circle- this could be small (even ornament size) medium or even really large!

Glue each section together and start forming the shape of the wreath.

Once the wreath is complete, begin to make small circled from the rolls or even from cardboard boxes- roll strips up into a circle.

Add smaller circles to the inside of the larger ones

Build up your wreath with as many circles as possible.
Once you are satisfied hang it on the wall!!
(Optional- paint it, give it a layer of gloss, add a bow, add cardboard shapes!)
I ended up painted my wreath black to match my living room decor!


s, so I've been making some:

I used pages from an old book...
And cut them into strips 1 inch wide:

Then I cut them into varying lengths...
Two 8 inches
Two 7 inches
Two 6 inches
and one 5 inches:

Then layer them with the longest on the outside,
and the 5 inch one on the inside...
And staple them all together on one end like so:

The 5 inch strip is the center...
Bring the other strips in towards it,
and staple them all together
[be sure to leave about an inch at the top of the center piece]:

Punch a hole in the top piece and tie a cord through it:

Hang on your tree:

I'm linking to these parties.
Origami Christmas Wreath

I am a real fan of folded paper decorations right now. Remember my Peace Doves??
You've got to try this craft. Here's a video I found on you tube. Bear in mind, this lady totally calls me boring in the beginning of the video (@45 seconds). And, I am still supporting her. Aren't I nice?!?!Yup, I'm nice.
Not too bad, eh?? I still have a hard believing she made 100 of these in 4 hours. Maybe I'm just a perfectionist, but it took me a lot longer 2:40 to make each one (did I just do my math right?! That could be a first!!).
For my wreaths, I included a very NON-BORING holly sprig and burlap button. How'd ya like dem apples, lady??

Awww, yeah
ages.

Glue the smaller circle to the centre of the ribbon.

Fold each larger circle in half, and then in half again, securing with a dab of hot glue.


Attach the folded circles to the smaller circle.


Add a little something to the centre.

I packaged my goodies in paper lunch bags {I trimmed the top with decorative scissors} and tied them up with the rosettes.


These paper rosettes may just make an appearance under t
Nenhum comentário:
Postar um comentário